
Ghetto Tubeless or, How to Make Any Tire/Rim into a Tubeless Setup
Why Tubeless?
Tubeless is faster, more comfortable, and more reliable than a tubed setup. Faster (more efficient that is) because no energy is being spent flexing an inner tube as the ground contact patch moves around the tire. More comfortable because you can run lower tire pressure for the same rolling resistance (and therefore faster because a comfortable bike is one you can pedal more easily over long distances). More reliable because the liquid sealant plugs punctures instantly (this works far better than sealant in an inner tube does). You usually don’t notice when you roll over thorns, because the holes seal up instantly.
Why Ghetto?
You don’t have tubeless rims, and you don’t want to get new wheels/rims
The tire you want isn’t specifically a tubeless tire
You can buy rims and tires that are tubeless specific, but you can also make any tire/rim combination tubeless with a bit of work. This is what is referred to as “ghetto tubeless”. There are several ways to do a ghetto tubeless setup, including the split tube method (good tutorial here). But in this post I will you show you how I do ghetto tubeless setups with Gorilla Tape and without the need for an air compressor or compressed CO2.
Caveats and Disclaimers:
I have only done this with tires 44mm wide and wider. Tubeless may not work so well with skinnier, higher pressure tires.
It is easier to do this with folding bead tires than with wire bead tires. I have successfully tubelessed every wire bead tire I’ve tried, but it can be a real bear to get a wire bead tire onto a rim with a tight tape job (necessary for a compressorless setup).
The use of some tires with liquid sealants is not recommended by the manufacturer. I have ignored that warning and not had any problems to date when using Orange Seal sealant.
The success of this method does depend on attention to detail. Namely how accurately you can trim the tape to width and apply it to the rim. It may also depend on your ability to seat a very tight tire onto a rim.
Sealant does dry up every few months or so and need to be replenished. Seems to dry up faster in tires with light-colored sidewalls than in tires with black sidewalls.
Air diffuses out of a tubeless tire faster than it does out of a tubed tire. So you will need to top off your tire pressure more frequently (every week to every few months depending on the tire). Single compound Maxxis DTH is on the shorter end, but it’s my favorite front tire. Schwalbe tires seem to be on the longer end of that spectrum.
It is not fast and easy to change tubeless tires. If you plan on changing tires often, it may be better to have multiple wheelsets.
If you haven’t done this before (which I’m guessing is the case since you’re reading this), it will probably be difficult and try your patience. So give yourself plenty of time and think about all the time you won’t be spending squatting on the side of a road trying to patch a stubborn hole in a tube.
Tools:
Floor pump (or mini floor pump. The faster you can pump air into the tire, the less precise your tape job can be)
Tire levers (I really like the flat 1847 Schwalbe levers for this https://www.schwalbetires.com/TIRE-LEVER. They work well when the tire is difficult to get onto the rim)
Maybe a knife for trimming the Gorilla Tape
Calipers or another measuring tool can be nice if you have difficulty judging required tape width by eye
Piers
Sealant injector (can buy one, or can get sealant that comes in an injector bottle already)
Components:
Tire (folding bead tires are easier for this than wire bead tires are)
Wheel you want to mount the tire on
Tubeless valve (you can spend money on these, or you can harvest them from dead inner tubes. Just make sure they have a threaded stem and a removeable valve core)
Materials:
Tubeless Sealant (I use Orange Seal Endurance Sealant)
Gorilla Tape – enough to go around your rim(s) 10 times or so. The amount needed will depend on how much you need to build up the surface of the rim bed.
Isopropyl alcohol
Liquid dish soap may be helpful
Rag or shop towel
Podcast, video essay, movie, or tv show
Overview:
What you are doing here is sealing the rim bed (it’s full of holes for the spoke nipples) and sealing the tire against the rim. That’s it. Liquid sealant seals all the little holes and gaps when you set it up, and seals any punctures from thorns, screws, staples, automotive fuses, etc.
Rim Bed Shape:
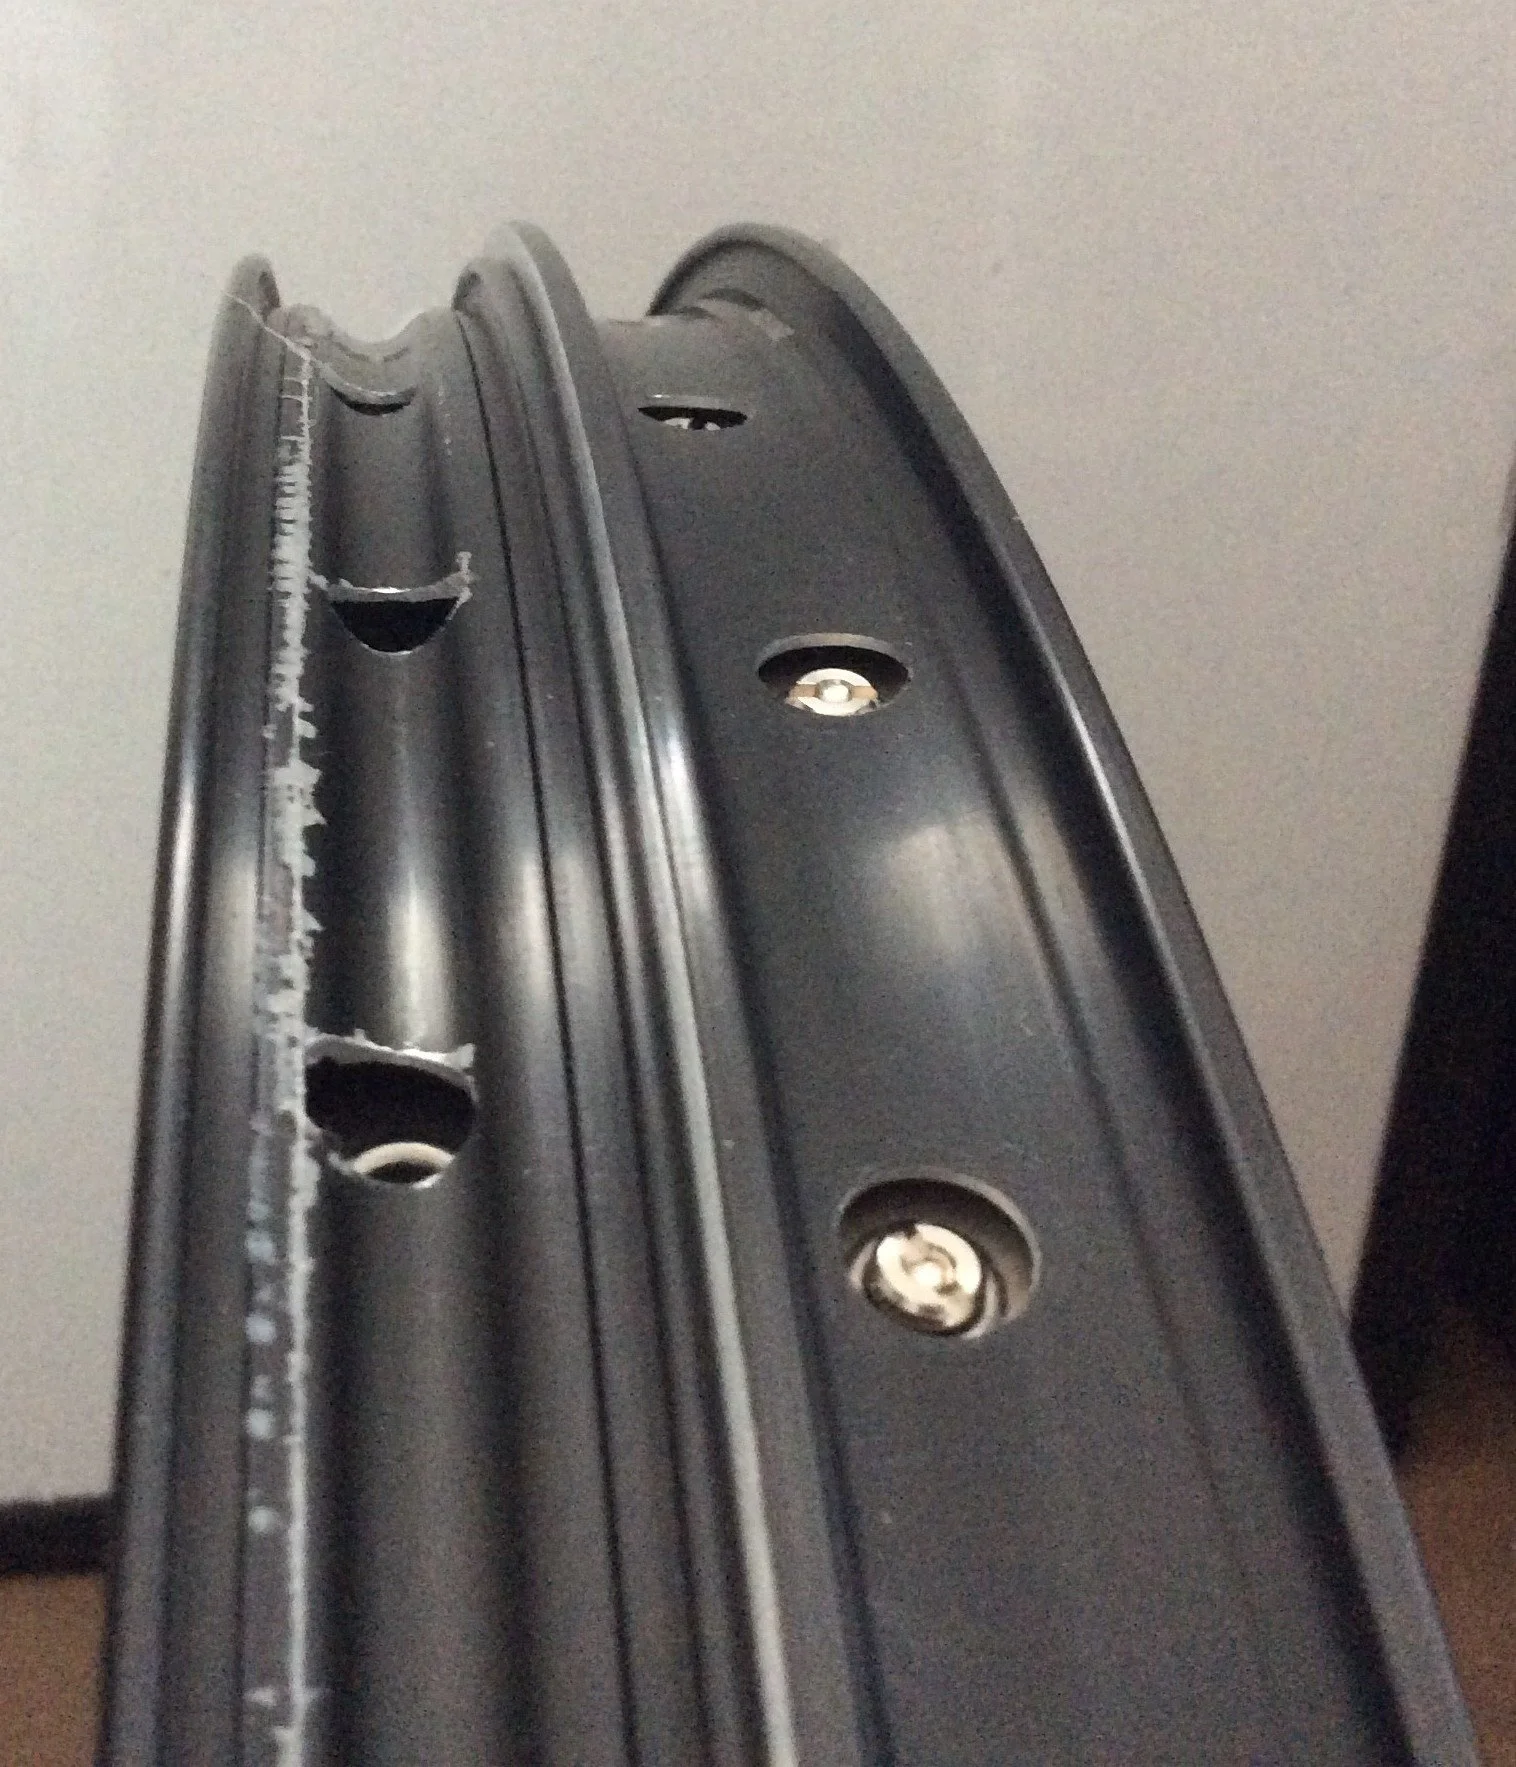
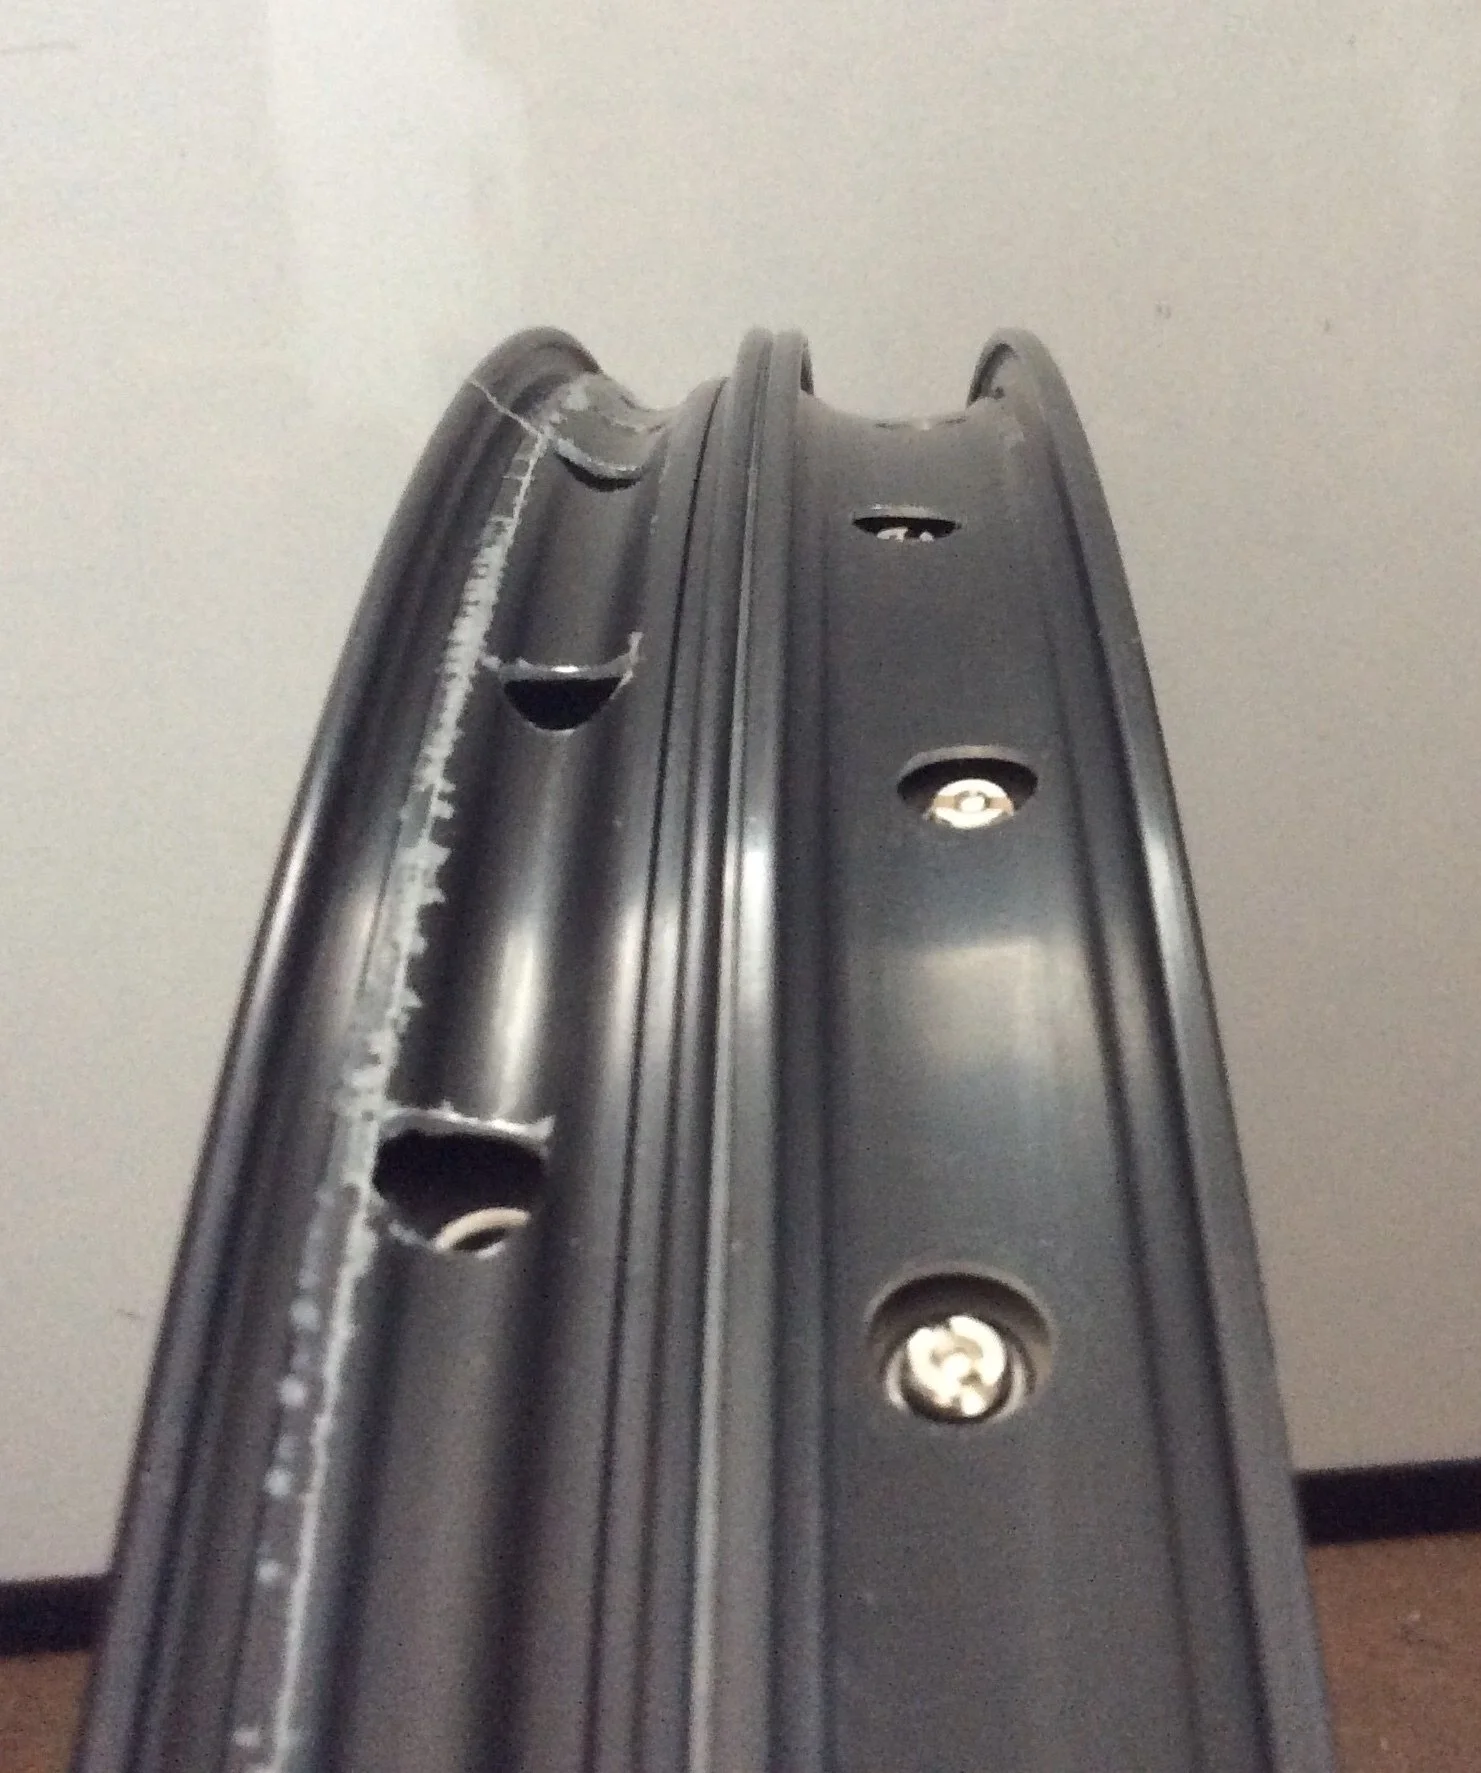
Figure 1. Rim profiles. Rim on the left is a tubeless rim, rim on the right is not
A tubeless ready rim has a distinct profile (figure 1). It has a well in the center, a shelf on each side for the tire bead, and usually a ridge just to the inside of each shelf. The well, being a smaller diameter than the shelves, allows you to get the tire over the edge of the rim. The shelves are what the beads of the tire seal against, and the ridge keeps the tire beads from falling off the shelves when the tire is deflated.
Rims and tires that are specified as tubeless are sized so the bead of the tire fits snugly on the shelf of the rim. Non-tubeless specific tires and rims usually have too loose of a fit to seal (the bead of the tire has a diameter significantly larger than the diameter of the shelf--if there even is a shelf), so the difference has to be made up with the Gorilla Tape. Some shaping of the rim bed profile can be done when applying the tape, giving it a shape closer to that of a tubeless specific rim.
Note how deep the well is on the rim pictured in figure 1 (Alex Adventurer 2). I think that manufacturers assume you will be seating tubeless tires onto tubeless rims with compressed air. Well I like to be able to fix bike problems on the side of the road or trail, and I don’t know about you, but I don’t carry a generator and air compressor on my bike all of the time. I also don’t have an air compressor at home, and chances are a lot of you don’t have one either.
The reason for the deep well is that it makes it easier to get the tire onto the rim. However, it also leaves a big air gap between the tire bead and the well. If you try to inflate the tire with an air compressor, there will be enough flow, in spite of this giant leak, to pop the beads of the tire onto the shelves of the rim. You will not be able to generate that much air flow with a floor pump, so if you want to be able to set the bead without a compressor, you will need to fill in that well with tape to make it shallower (or if you are starting with a non-tubeless rim, don’t make the well so deep).
Why Gorilla Tape?
Gorilla Tape has strong adhesive, is thick enough so it doesn’t take too many layers to build up to the right thickness, is easy to tear thinner widths off a roll, and is easy to source. It works well enough that I haven’t gone looking for anything better. You can buy tubeless rim tape, but it’s usually pricey and will be pretty thin (perfect for sealing a rim without building up thickness, but if you’re doing ghetto tubeless you want to build up thickness).
Procedure
Ok now we can get onto the actual steps.
Remove any rim tape that might be already on your rim and wipe down the rim with isopropyl alcohol or whatever solvent suits your fancy. This will ensure a good strong bond between the tape and the rim.
Evaluate the profile of your rim bed. Does it have shelves for the tire bead? If so, are they nice and wide, or are they narrow? The rim on the right of figure 1 (Sun Rims Rhyno Lite) does have shelves, but they are pretty narrow. There is also no ridge between each shelf and the well. So as I build up the thickness of the well, I’m also going to make those shelves wider and add a ridge between them and the well.
Don’t try to put one skinny strip (or more) of Gorilla Tape on top of another. The stack will squirm sideways under pressure and change the profile you are trying to build. So if you think you will need multiple skinny strips to build the shape you want, alternate them between wider strips.
When you are laying down the tape you need to keep it pulled pretty tight so you don’t get air bubbles. Stretching it this way also helps it to conform neatly to the shape of the rim and activates the adhesive (adhesive tapes use pressure sensitive adhesive on a carrier. If you want you can look up how these PSAs work).
In figure 2 you can see that I decided to start with a skinny strip on each side of the rim. As the process progresses you can see the effect of placing the strips the way I did.
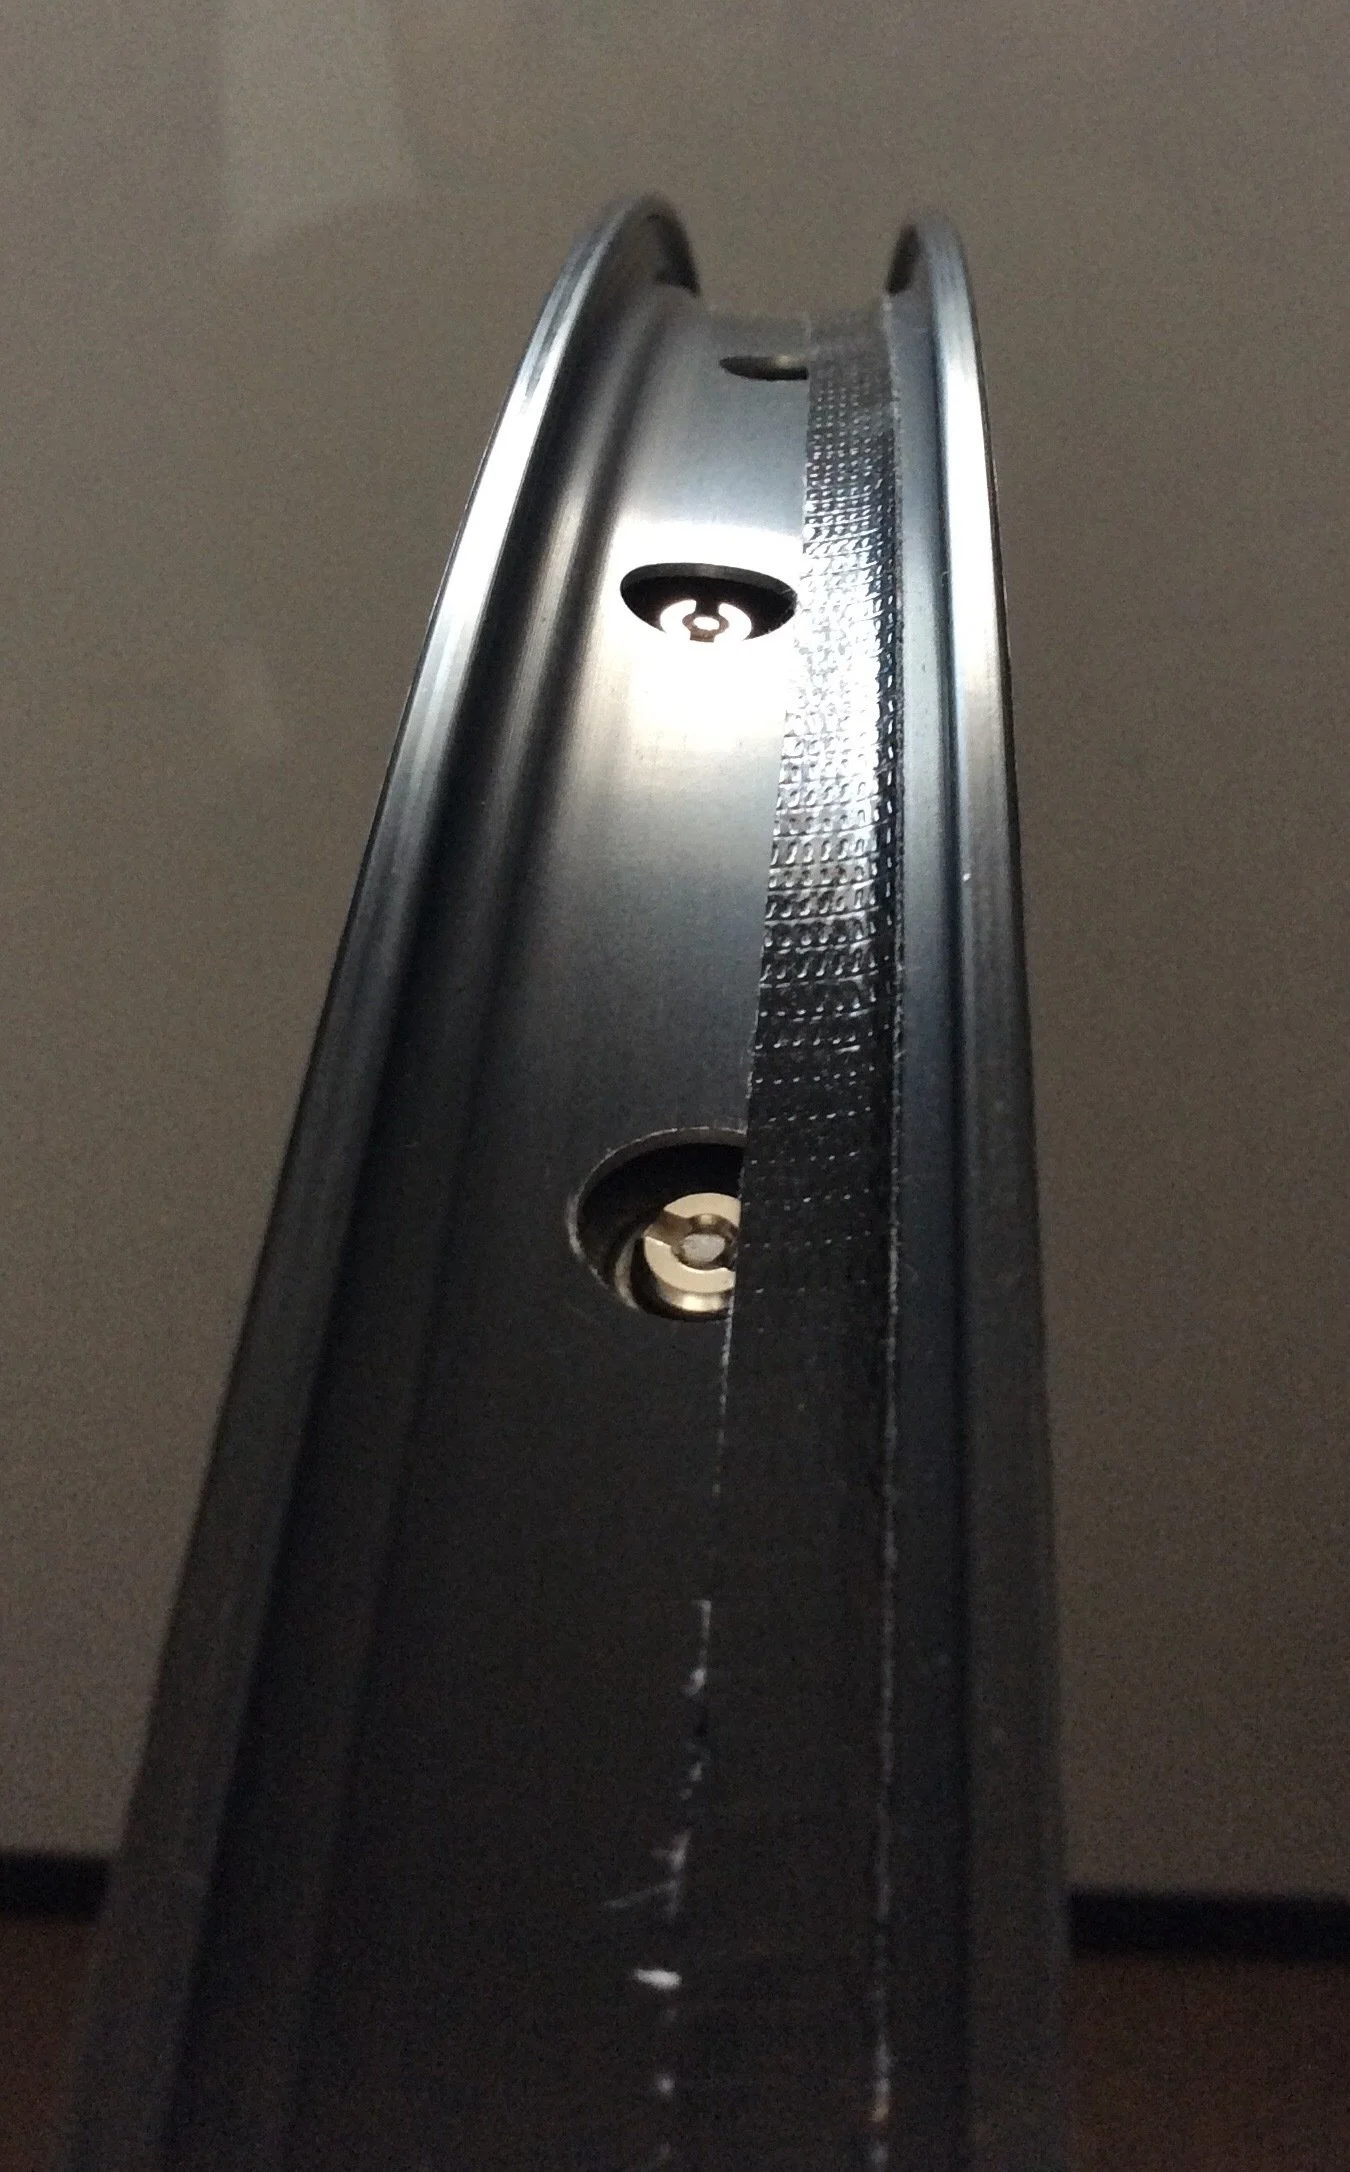
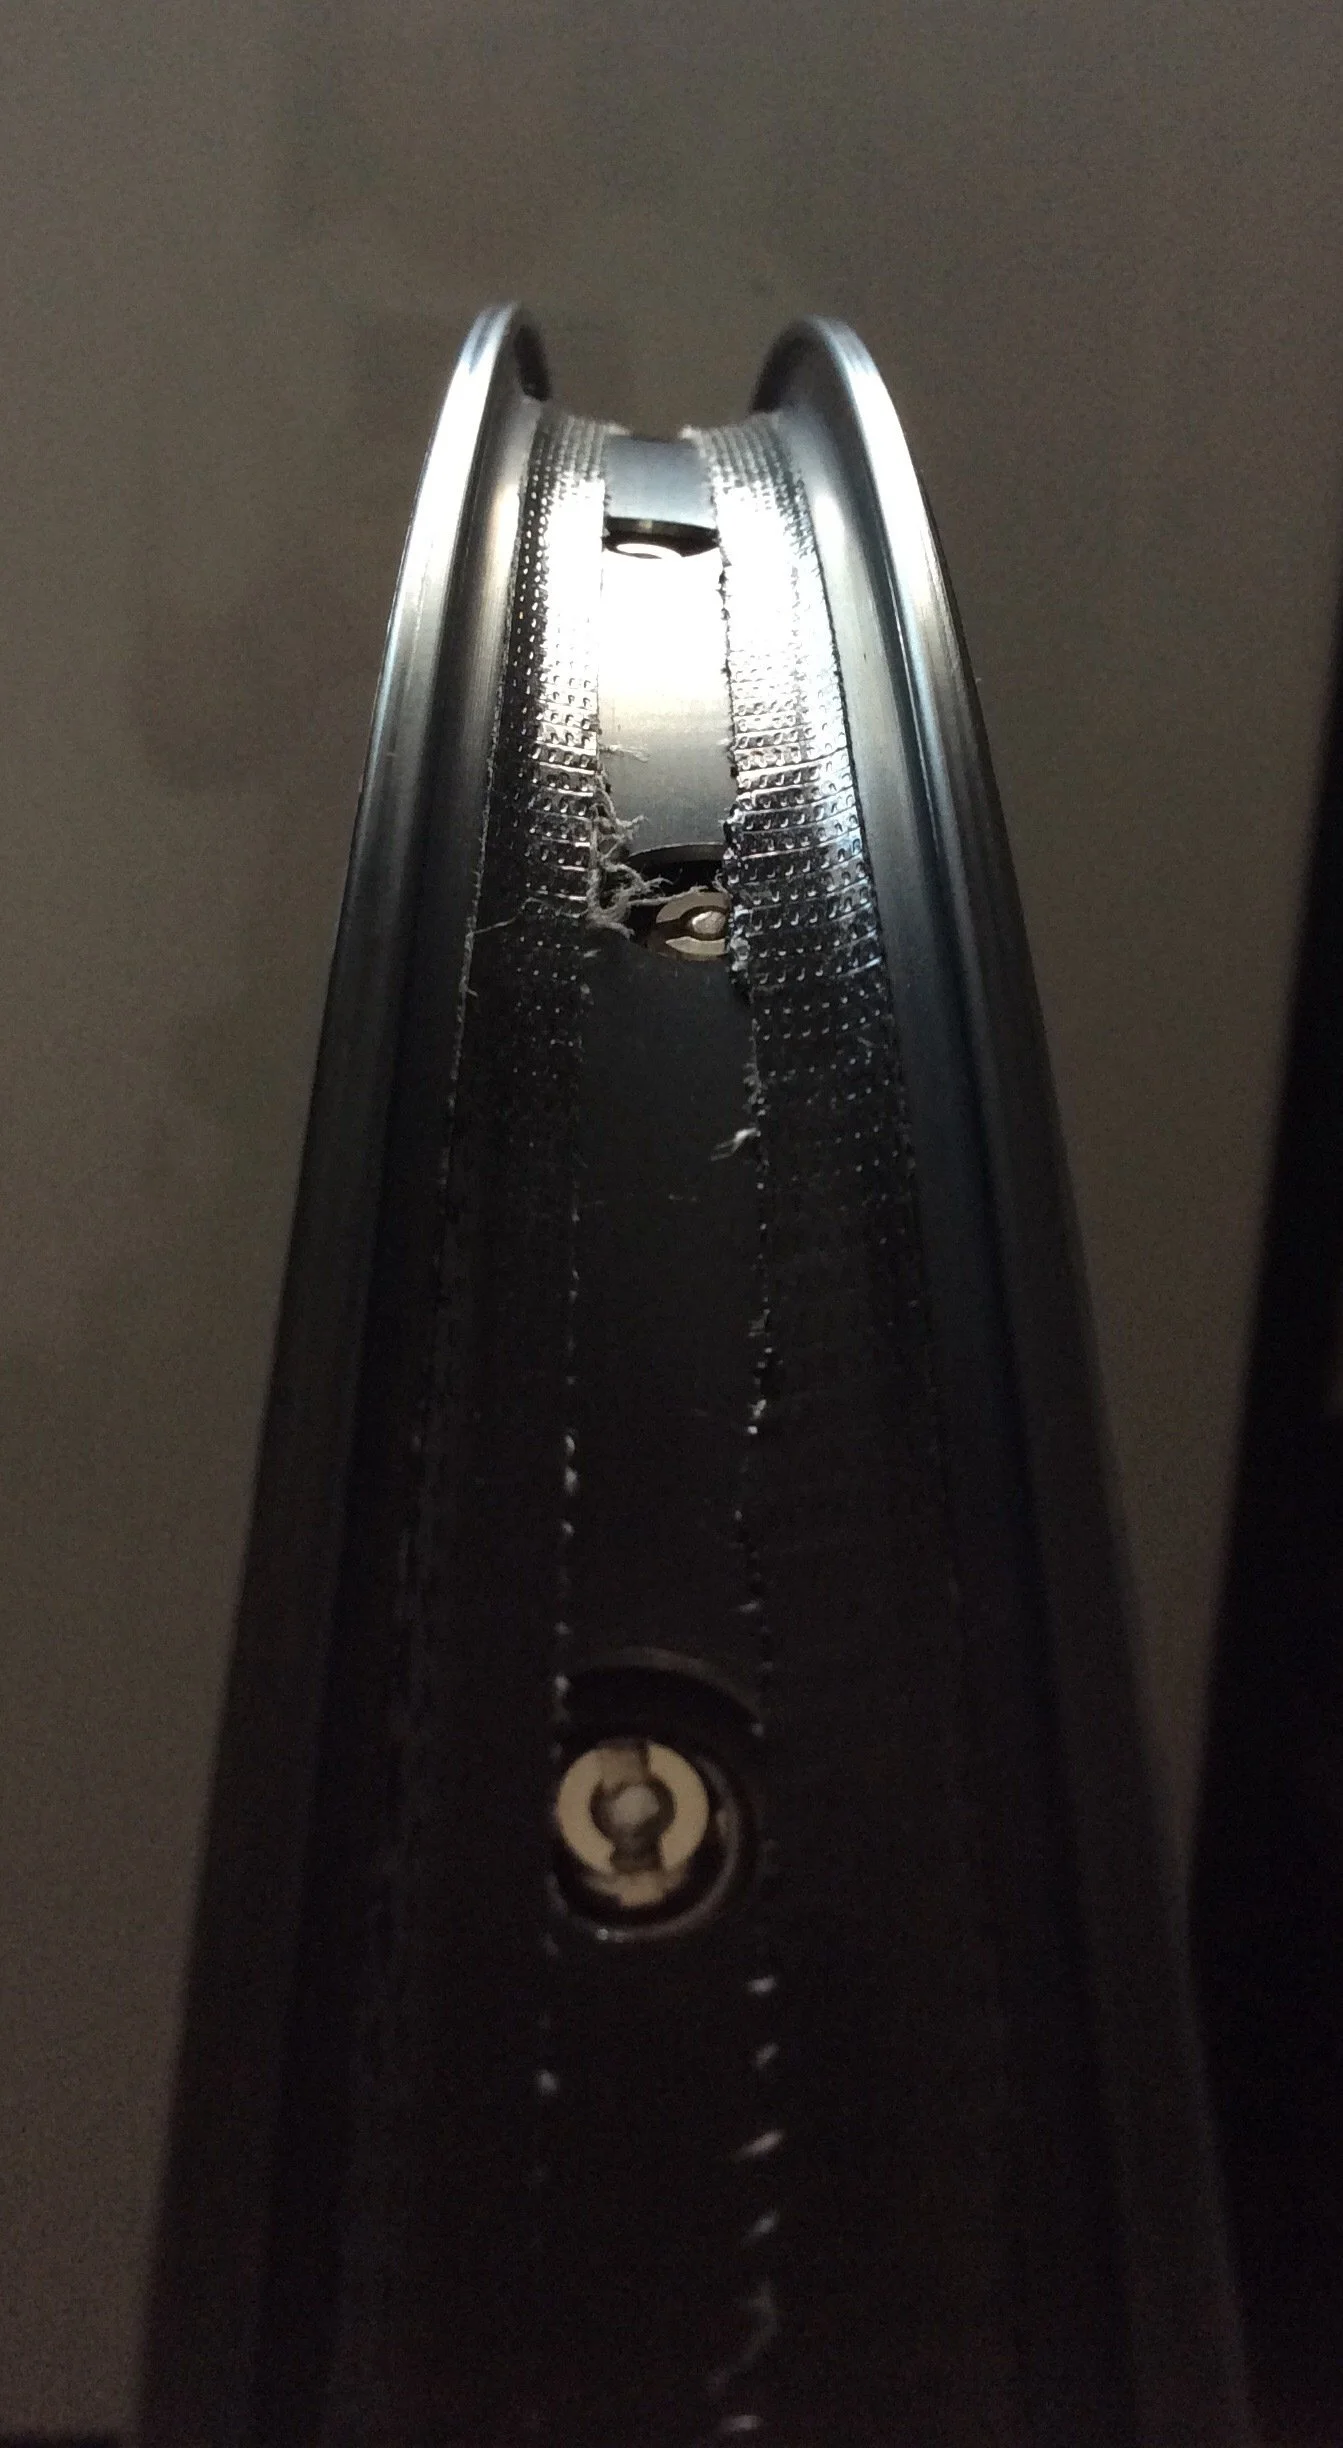
Figure 2. A skinny strip on each side of the rim, riding up the side of the existing shelf.
After these skinny strips I added a wider layer of tape. You can see in figure 3 how wide I cut/tore the strip. In this case I sized it so the edges landed pretty much on top of the outer edges of the skinny strips.
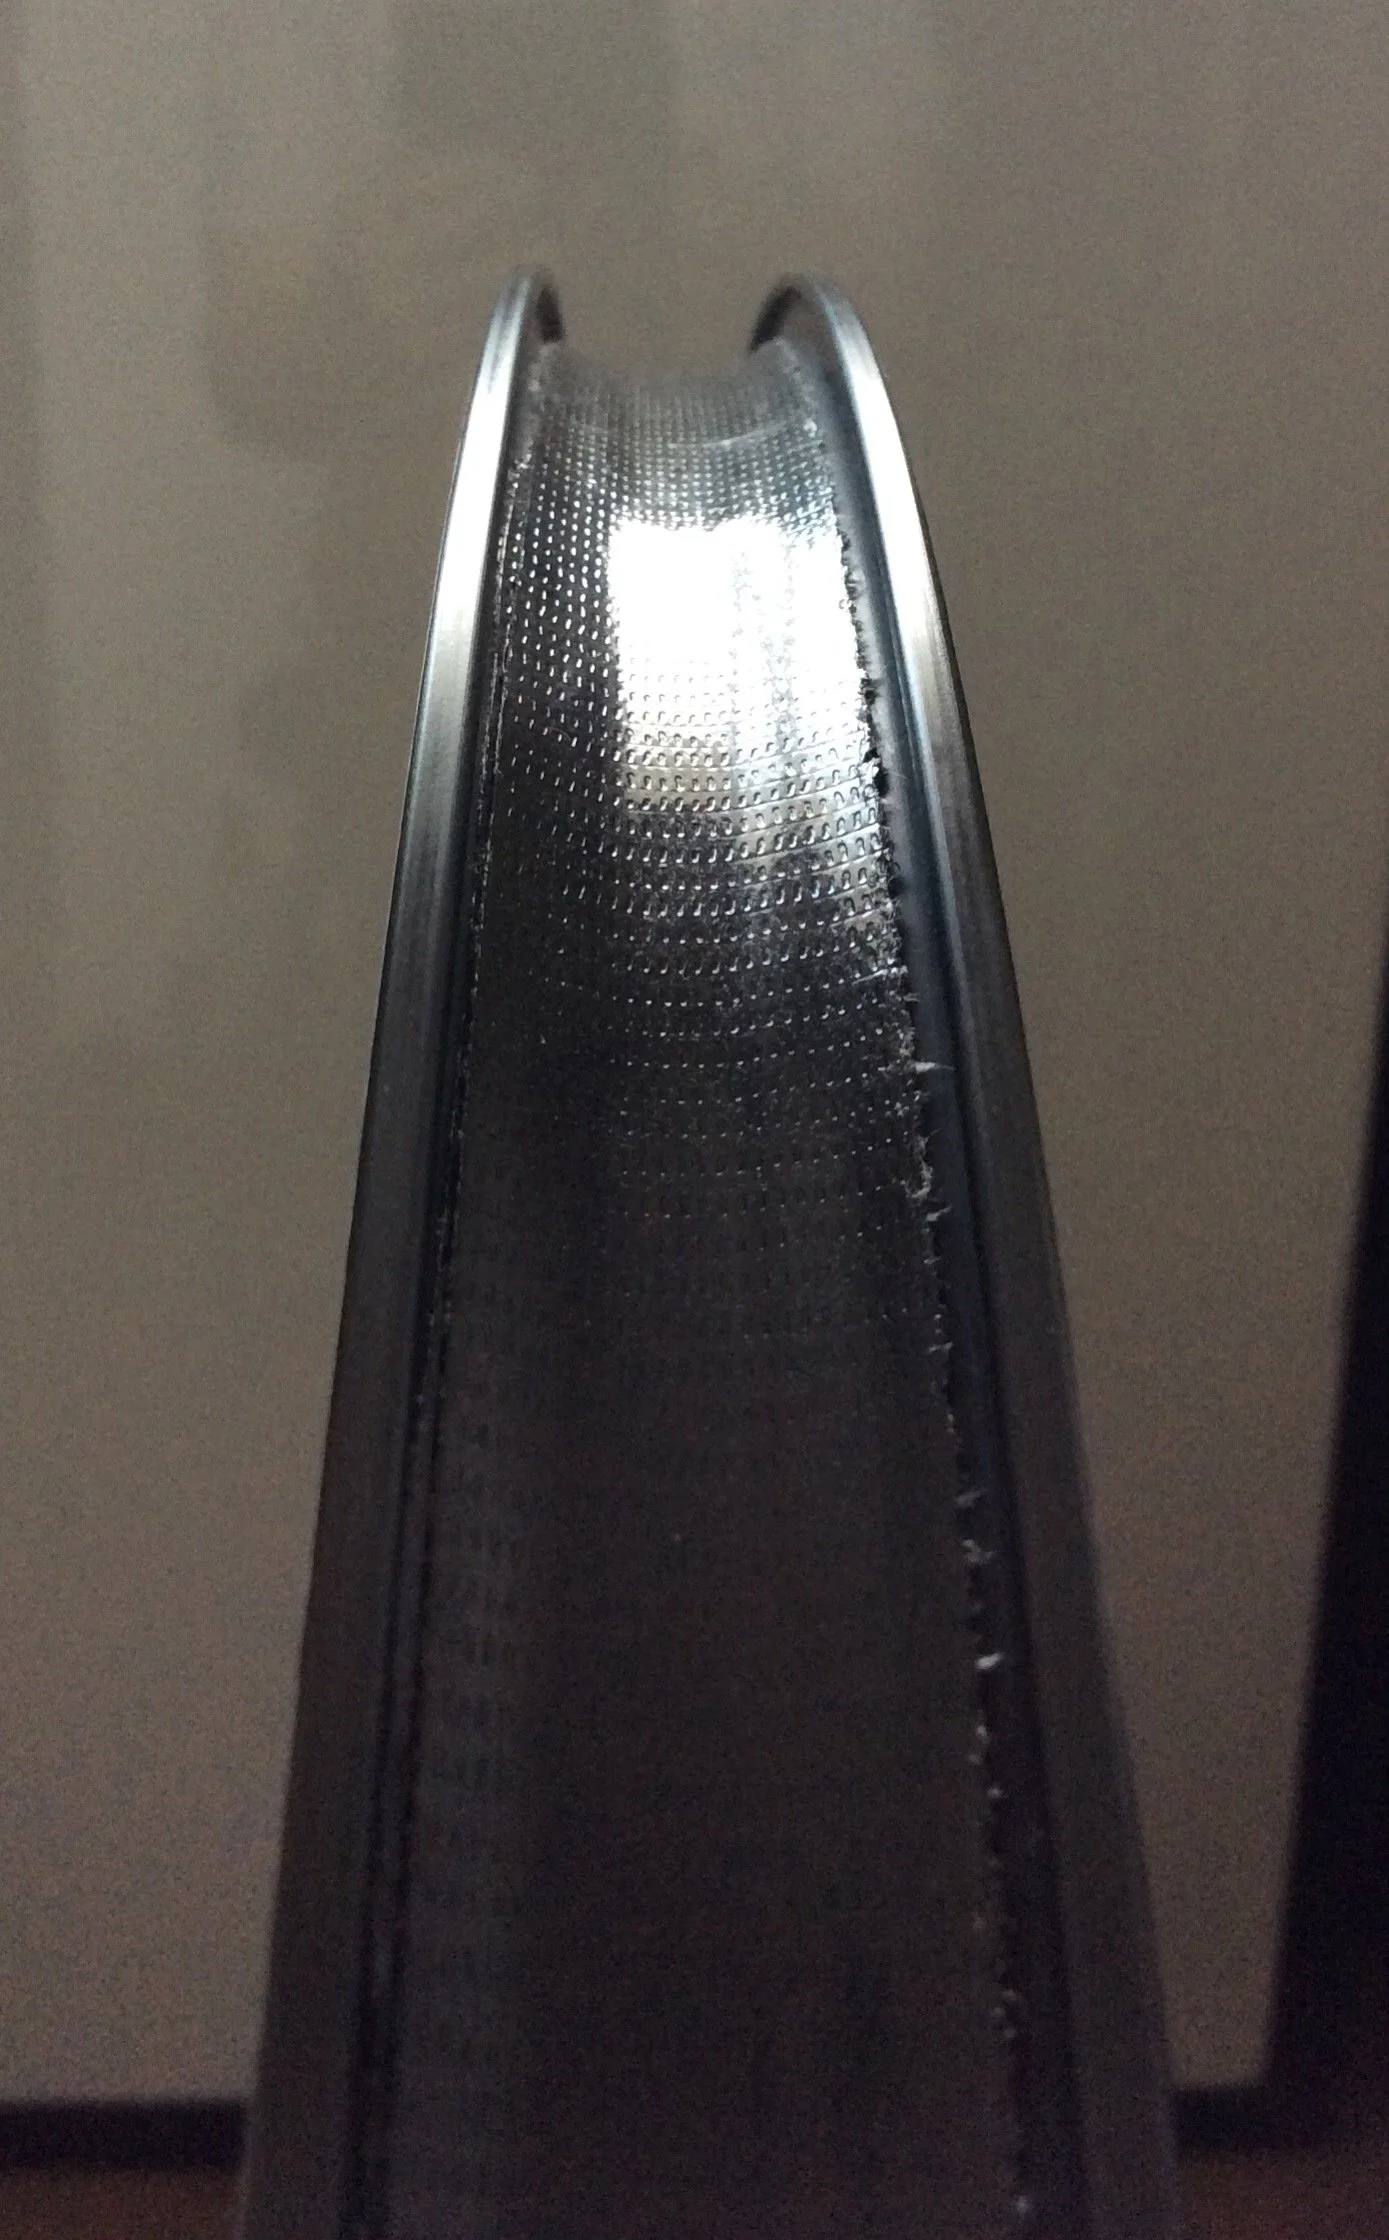
Figure 3. Well layer 1
I next tried to do two more narrow strips on the sides, but I went so wide on these that they met in the middle (figure 4). I could have done the same thing with a single strip twice as wide, but this is a good illustration of what you can do if you don’t think you can cut/tear strips the exact width you want. I put the edges of these strips slightly inward from the edges of the previous layer.
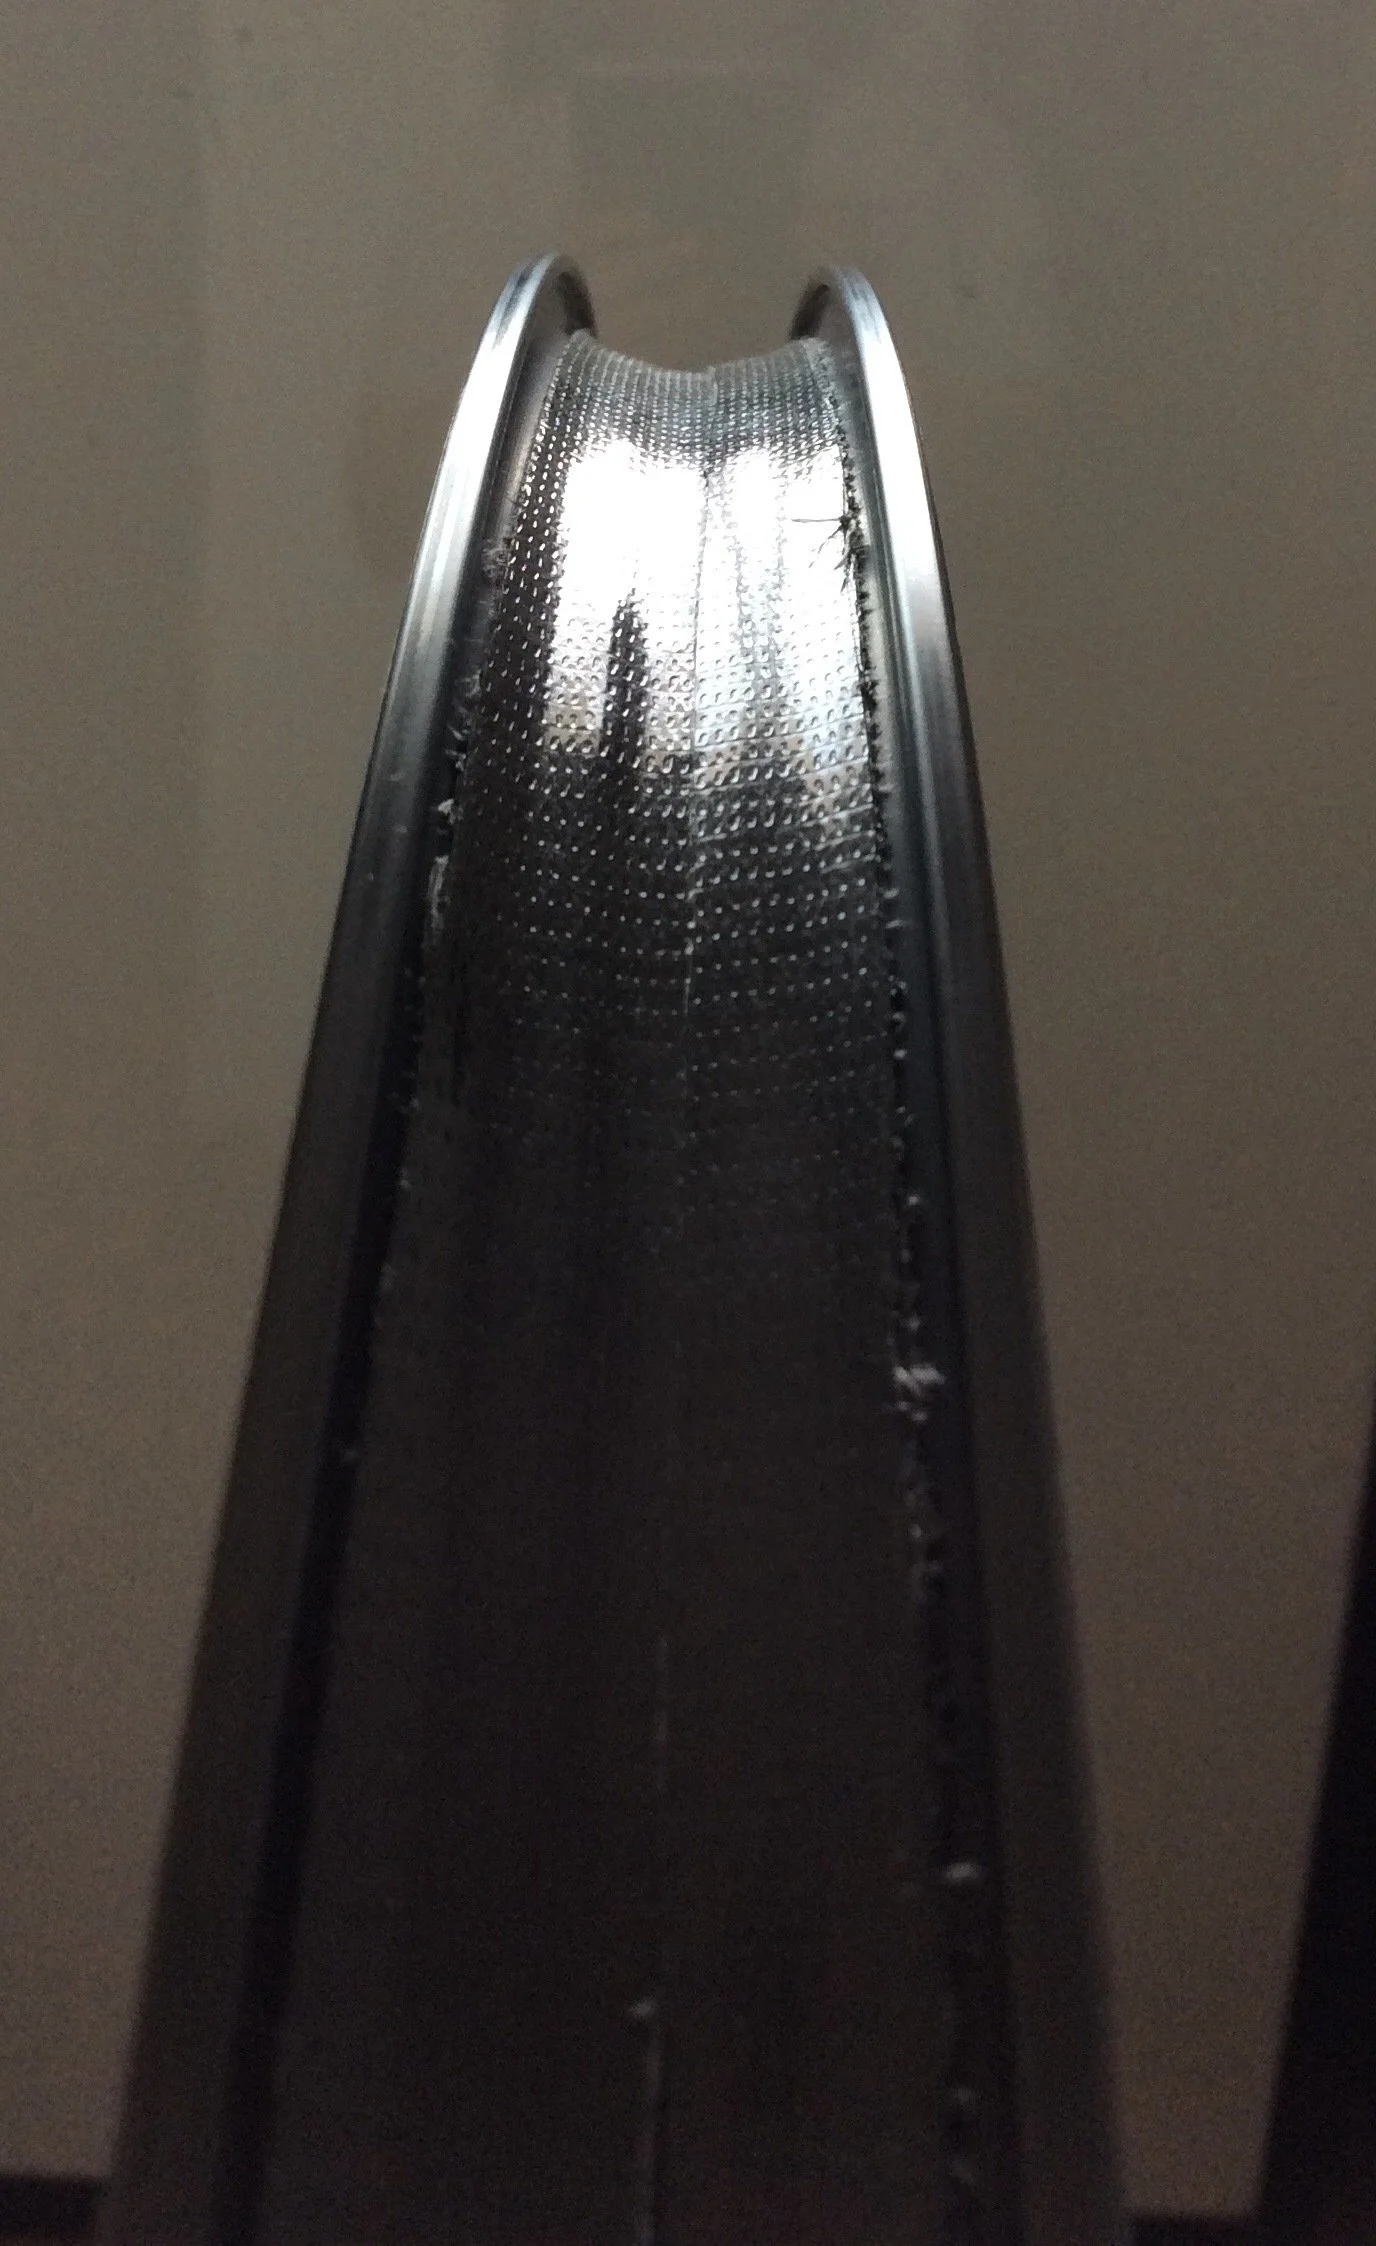
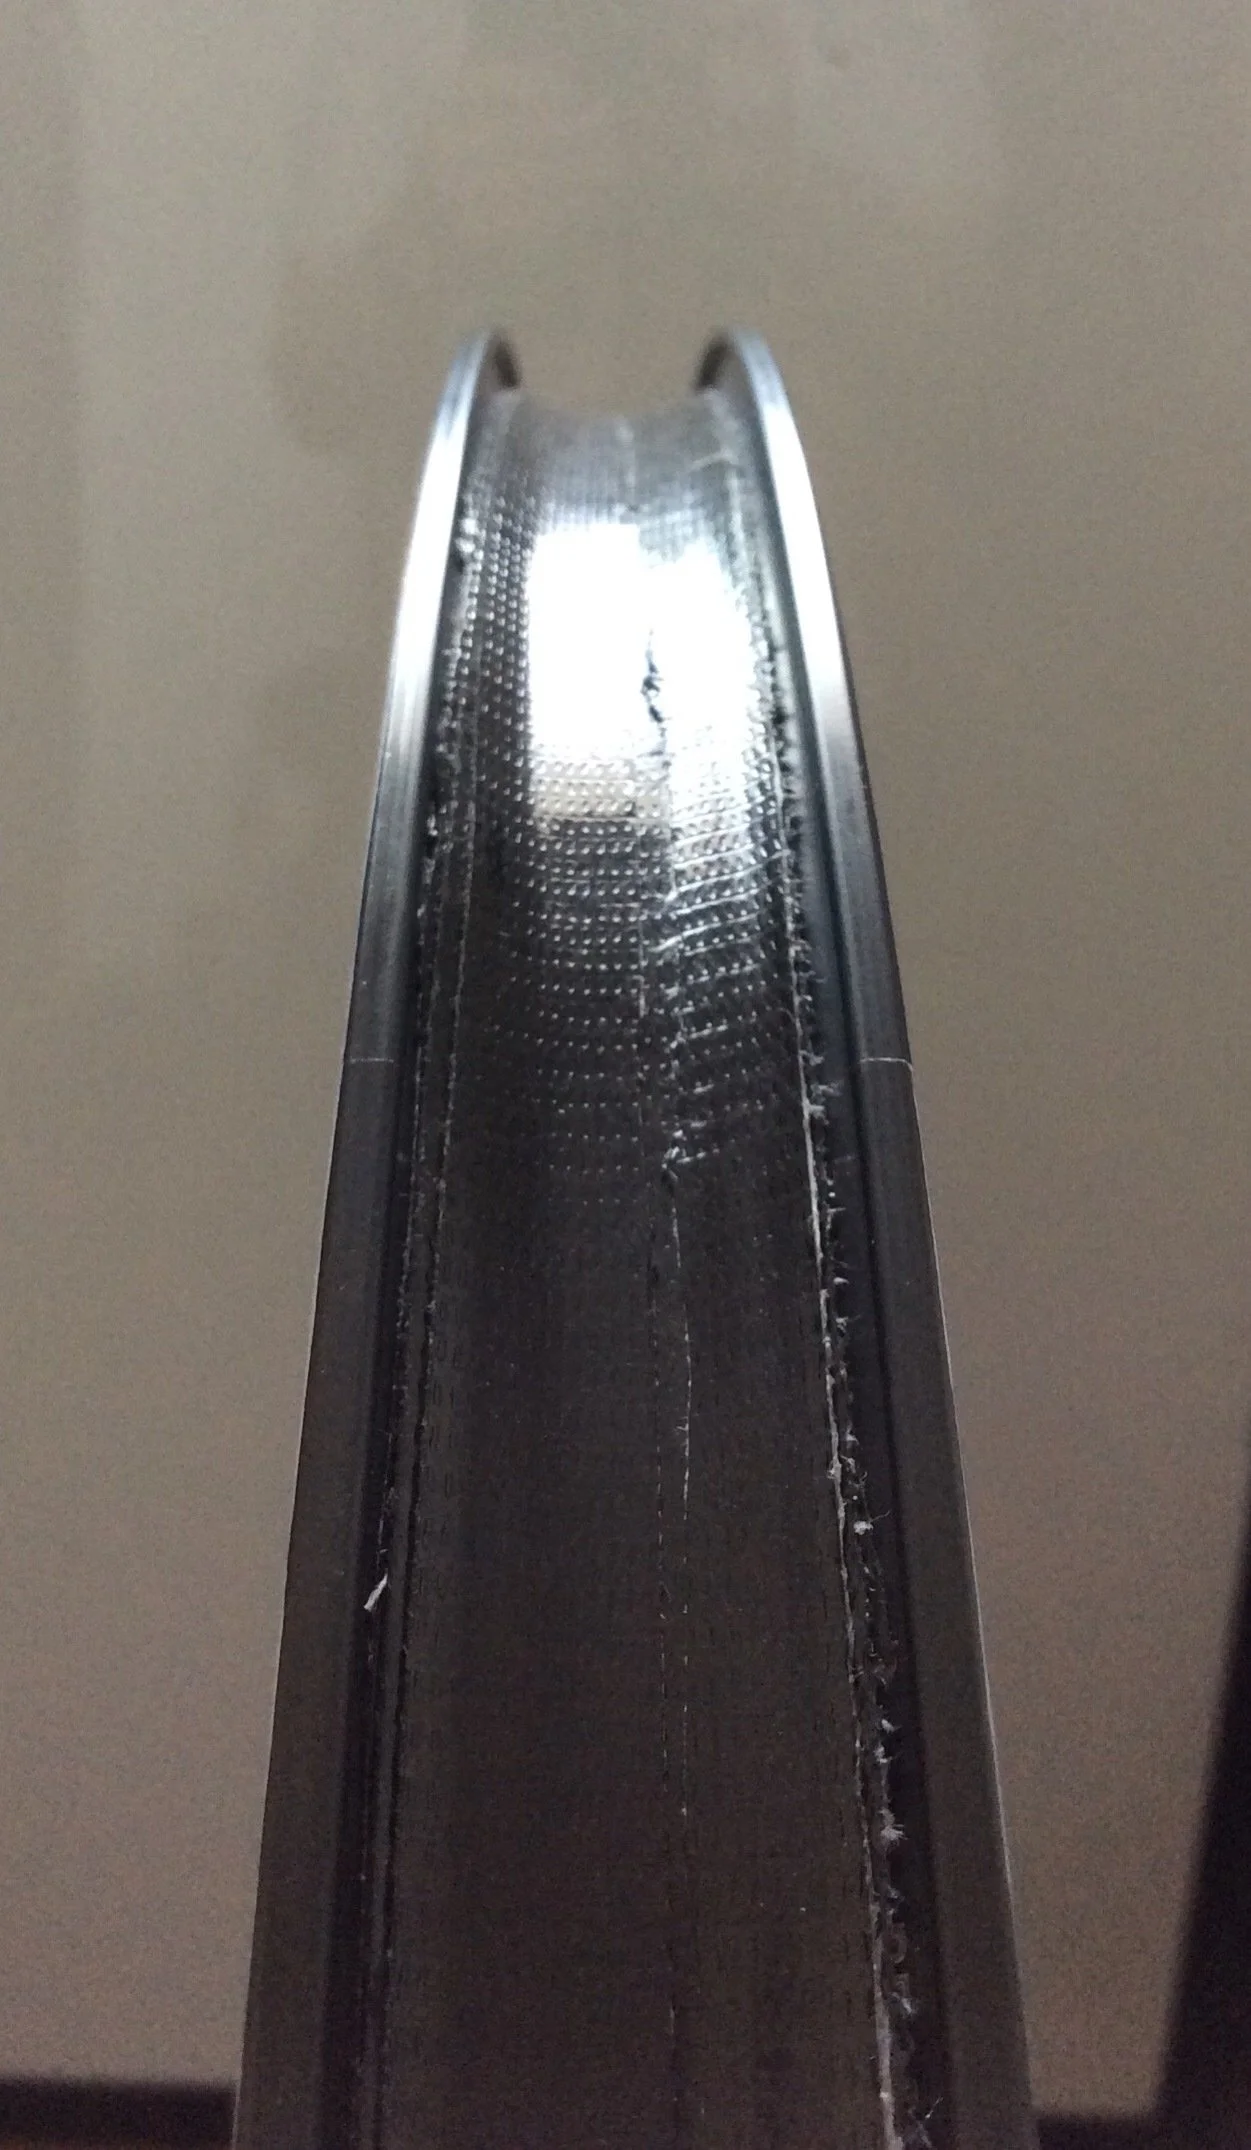
Figure 4. Well layer 2 (two strips that meet in the middle)
After this I put on a wide strip of tape, with the edges slightly farther inboard (figure 5). At this point you can start to see the formation of the ridge between the well and the shelves.
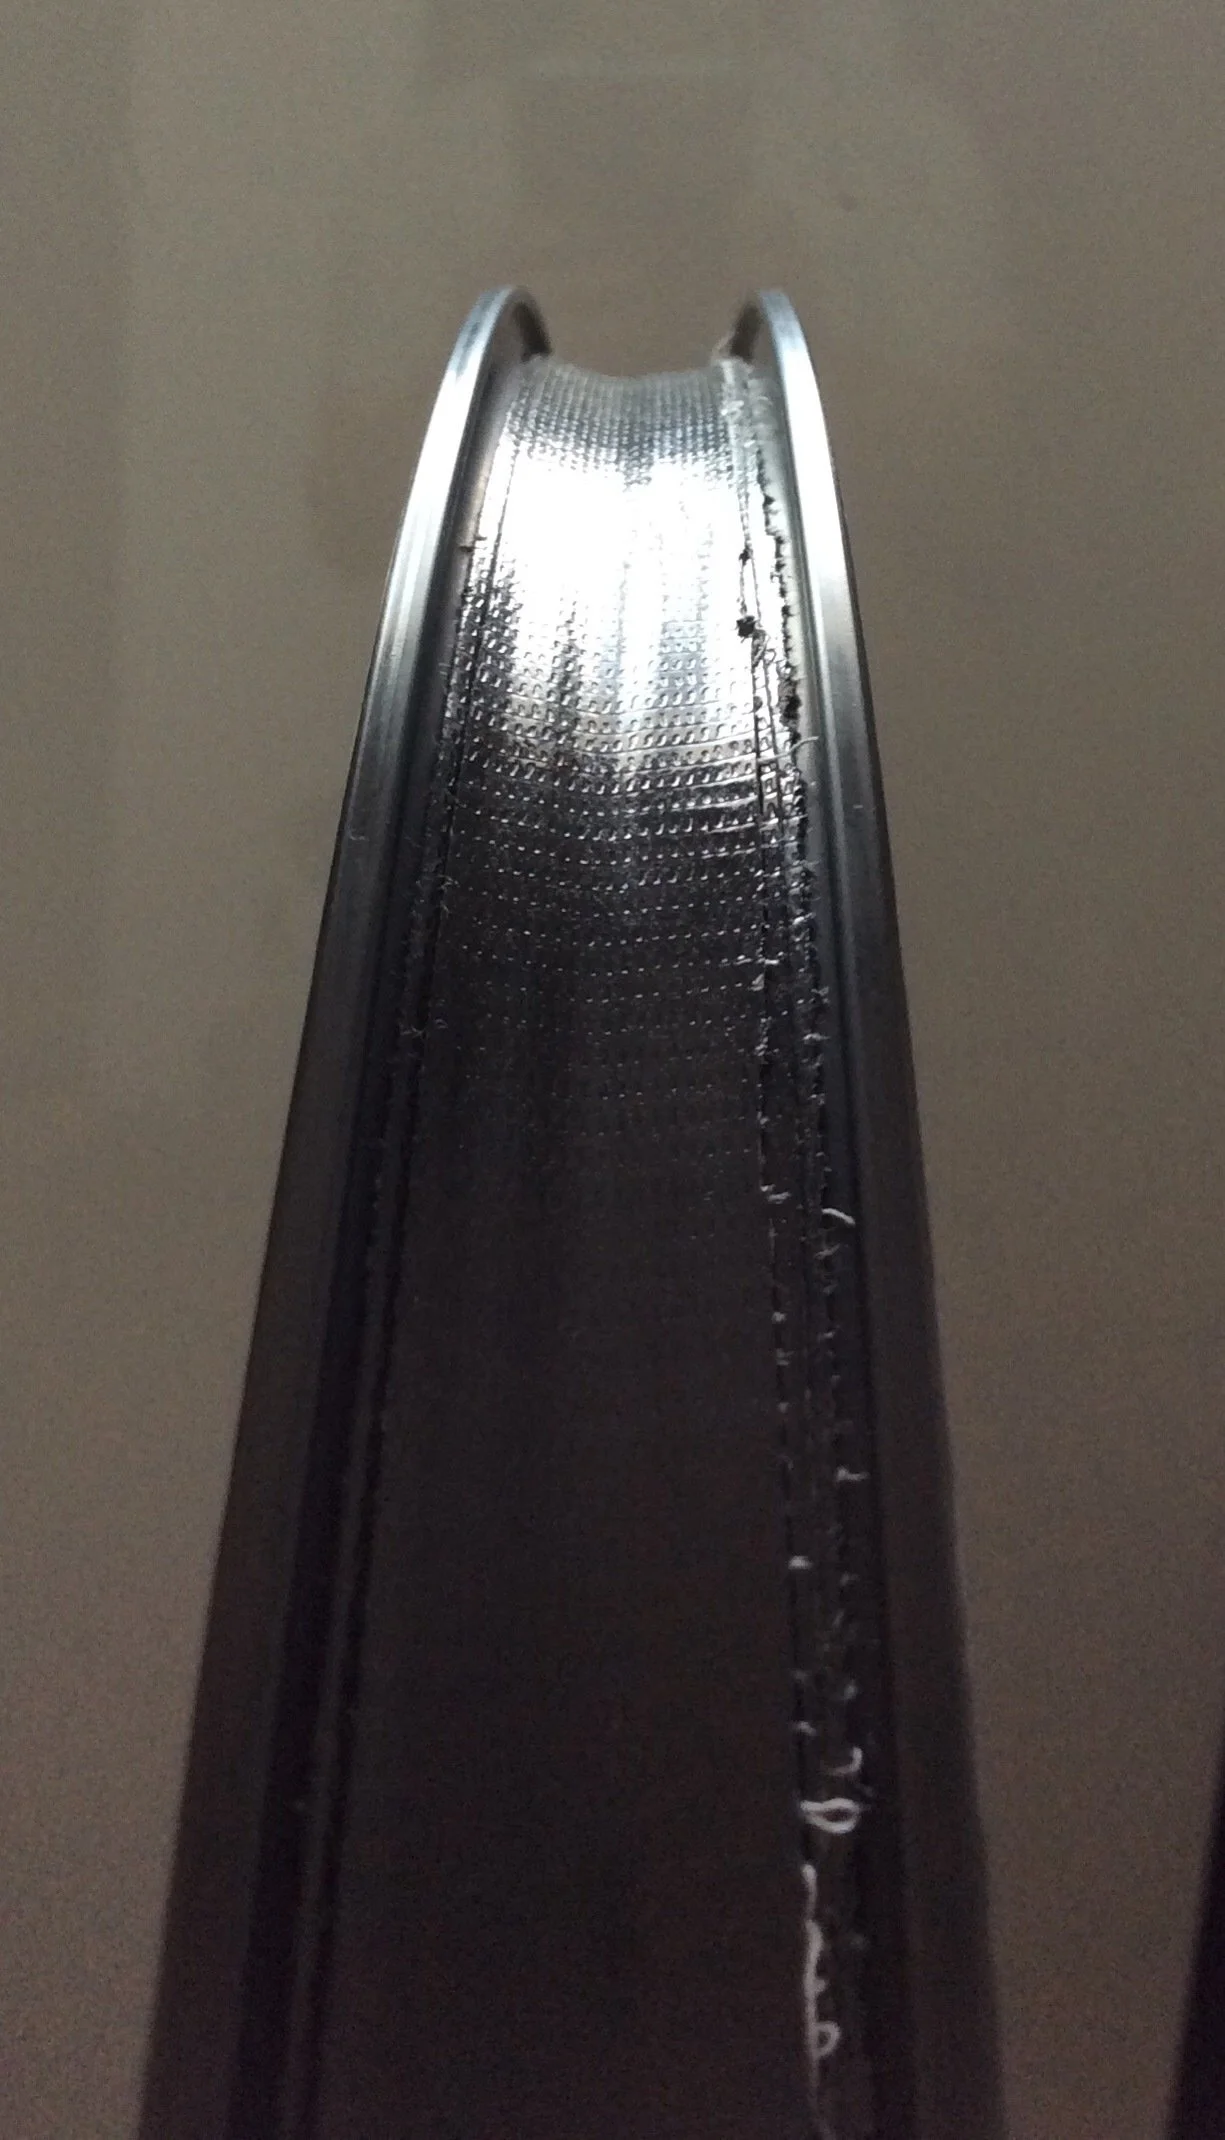
Figure 5. Well Layer 3, formation of the well, ridges, and shelves becoming visible
At this point I put the tire on to get an idea of how many more layers of tape I needed (figure 6). It was difficult for the camera to capture what I was seeing, but what I did was pull the tire away from the rim to see how much space there was. I estimated (from experience, but also because I checked the tire fit before I started, and these 3 layers ate about half the gap) that I would need three more layers to get the well to the diameter I wanted.
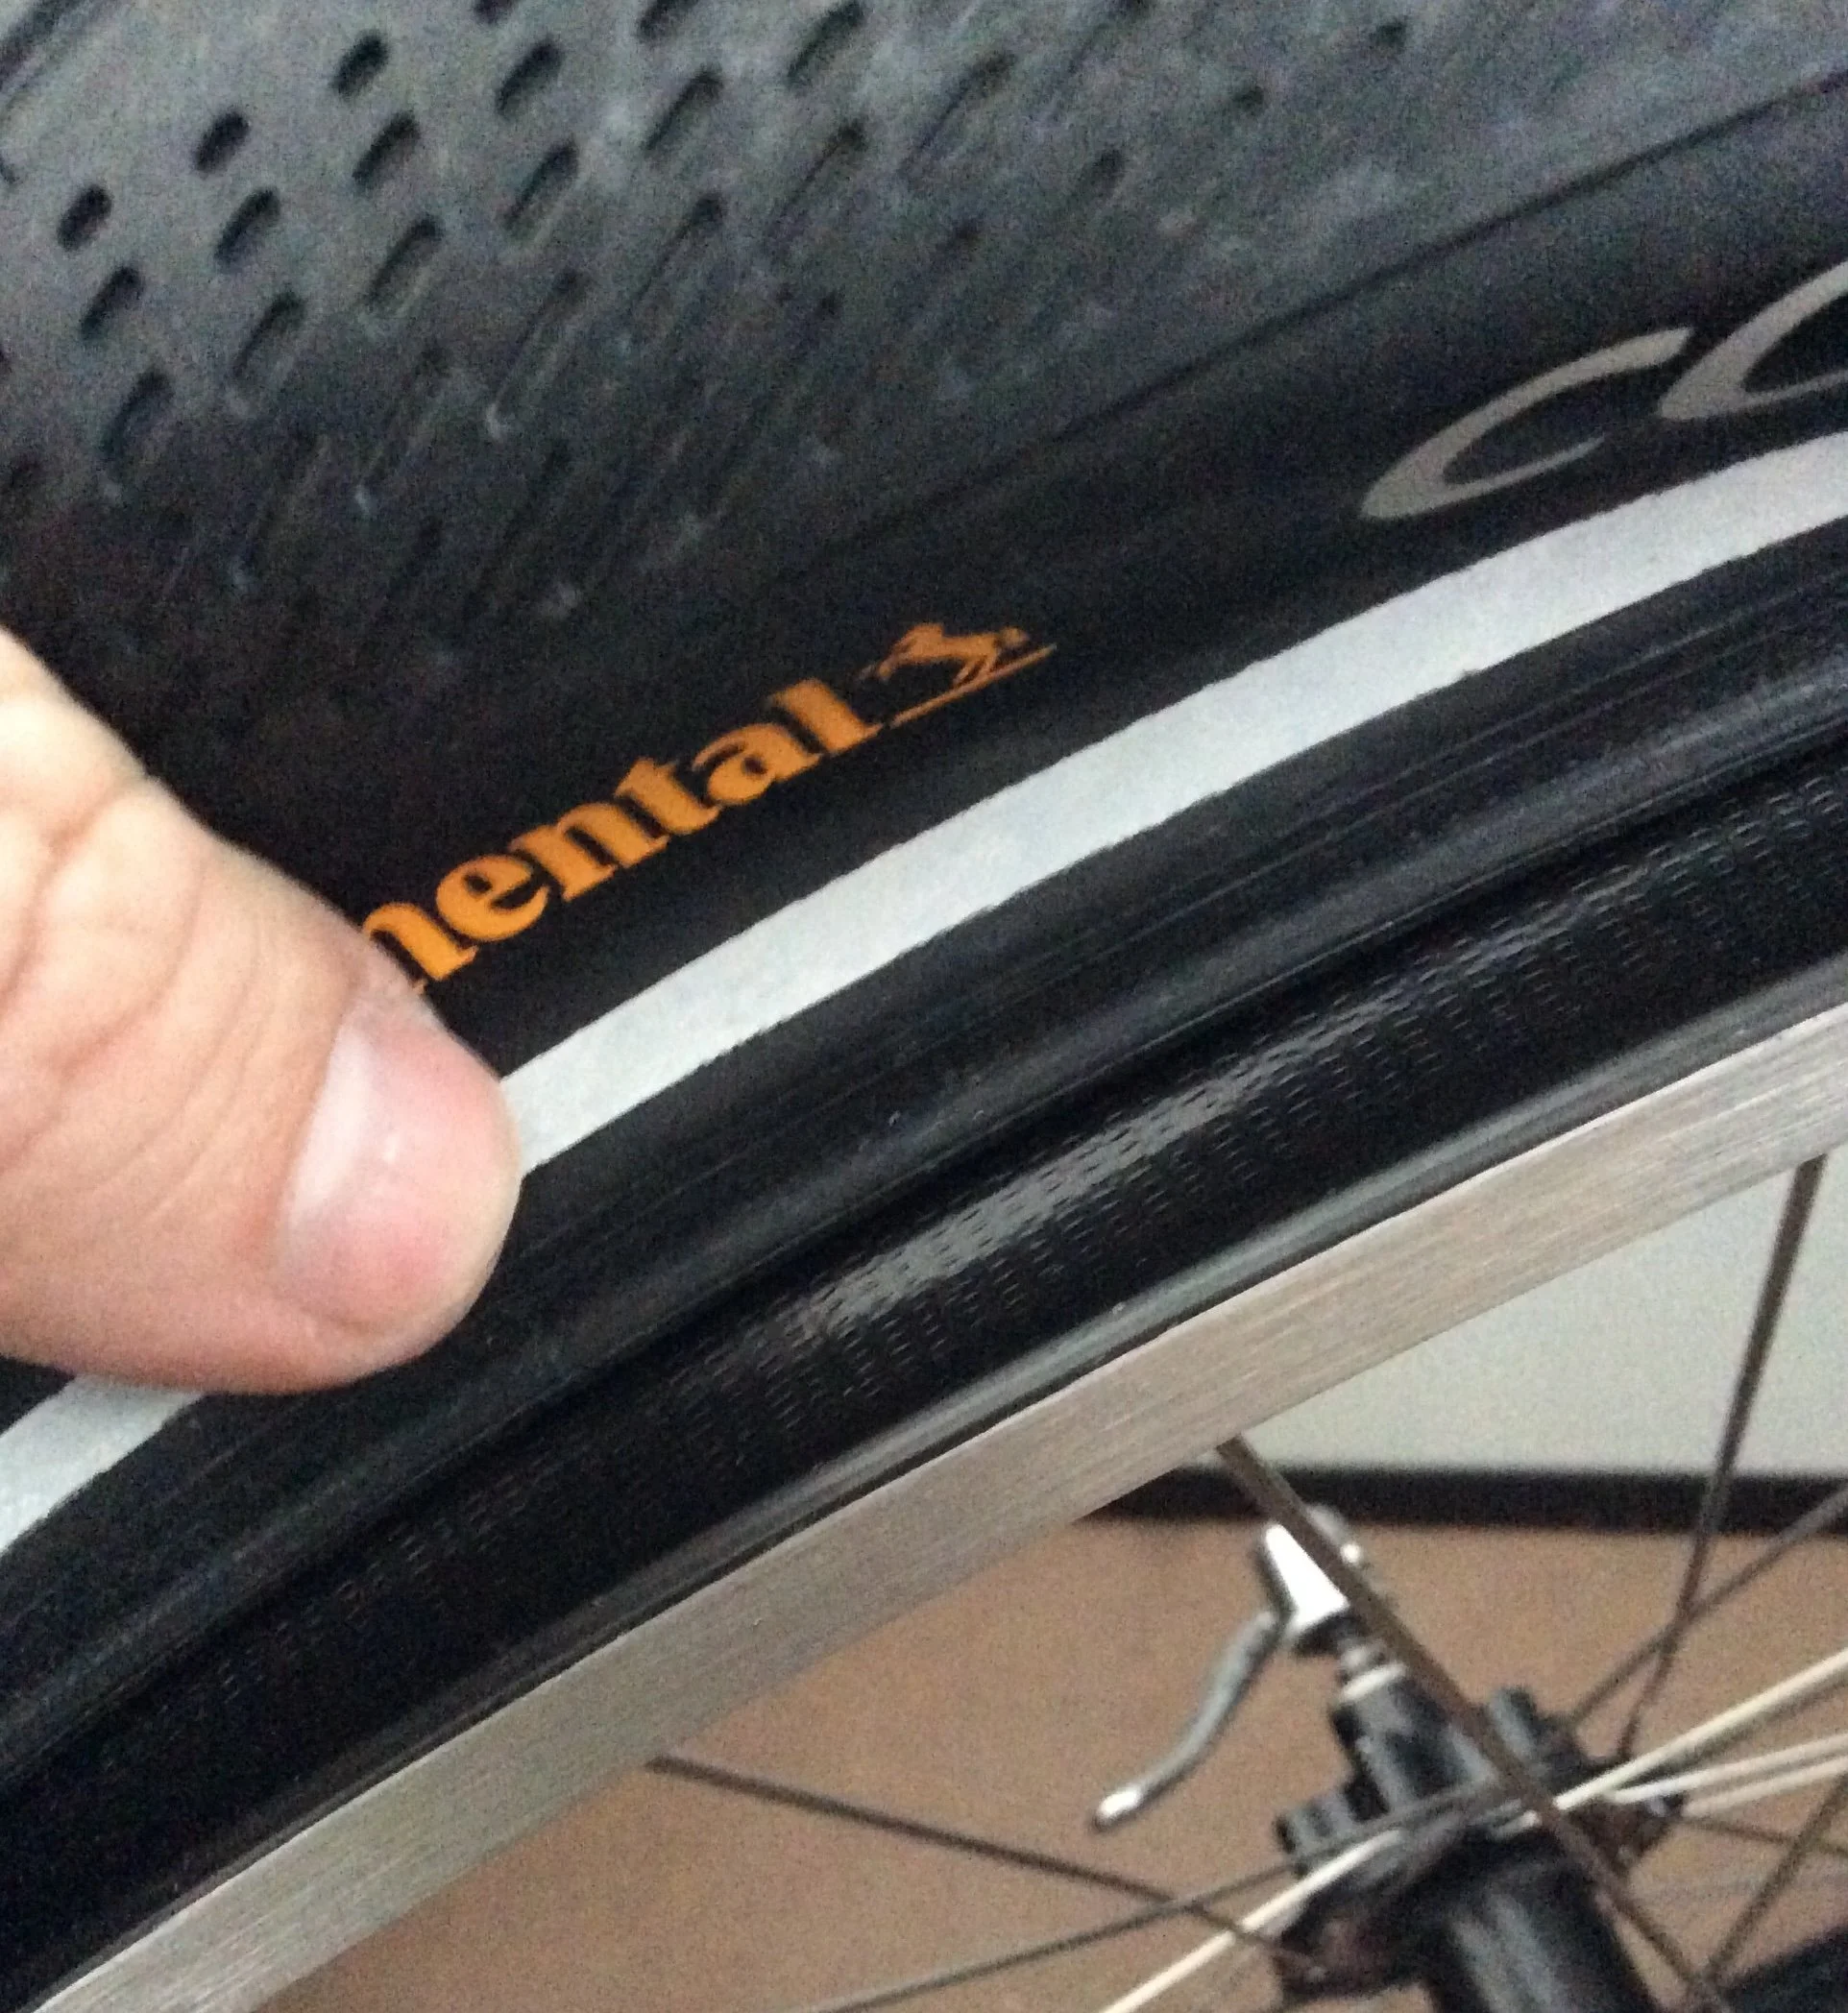
Figure 6. Tire installed to get an idea of how many more layers of tape I would need
For the next layer I went thinner again (figure 7).
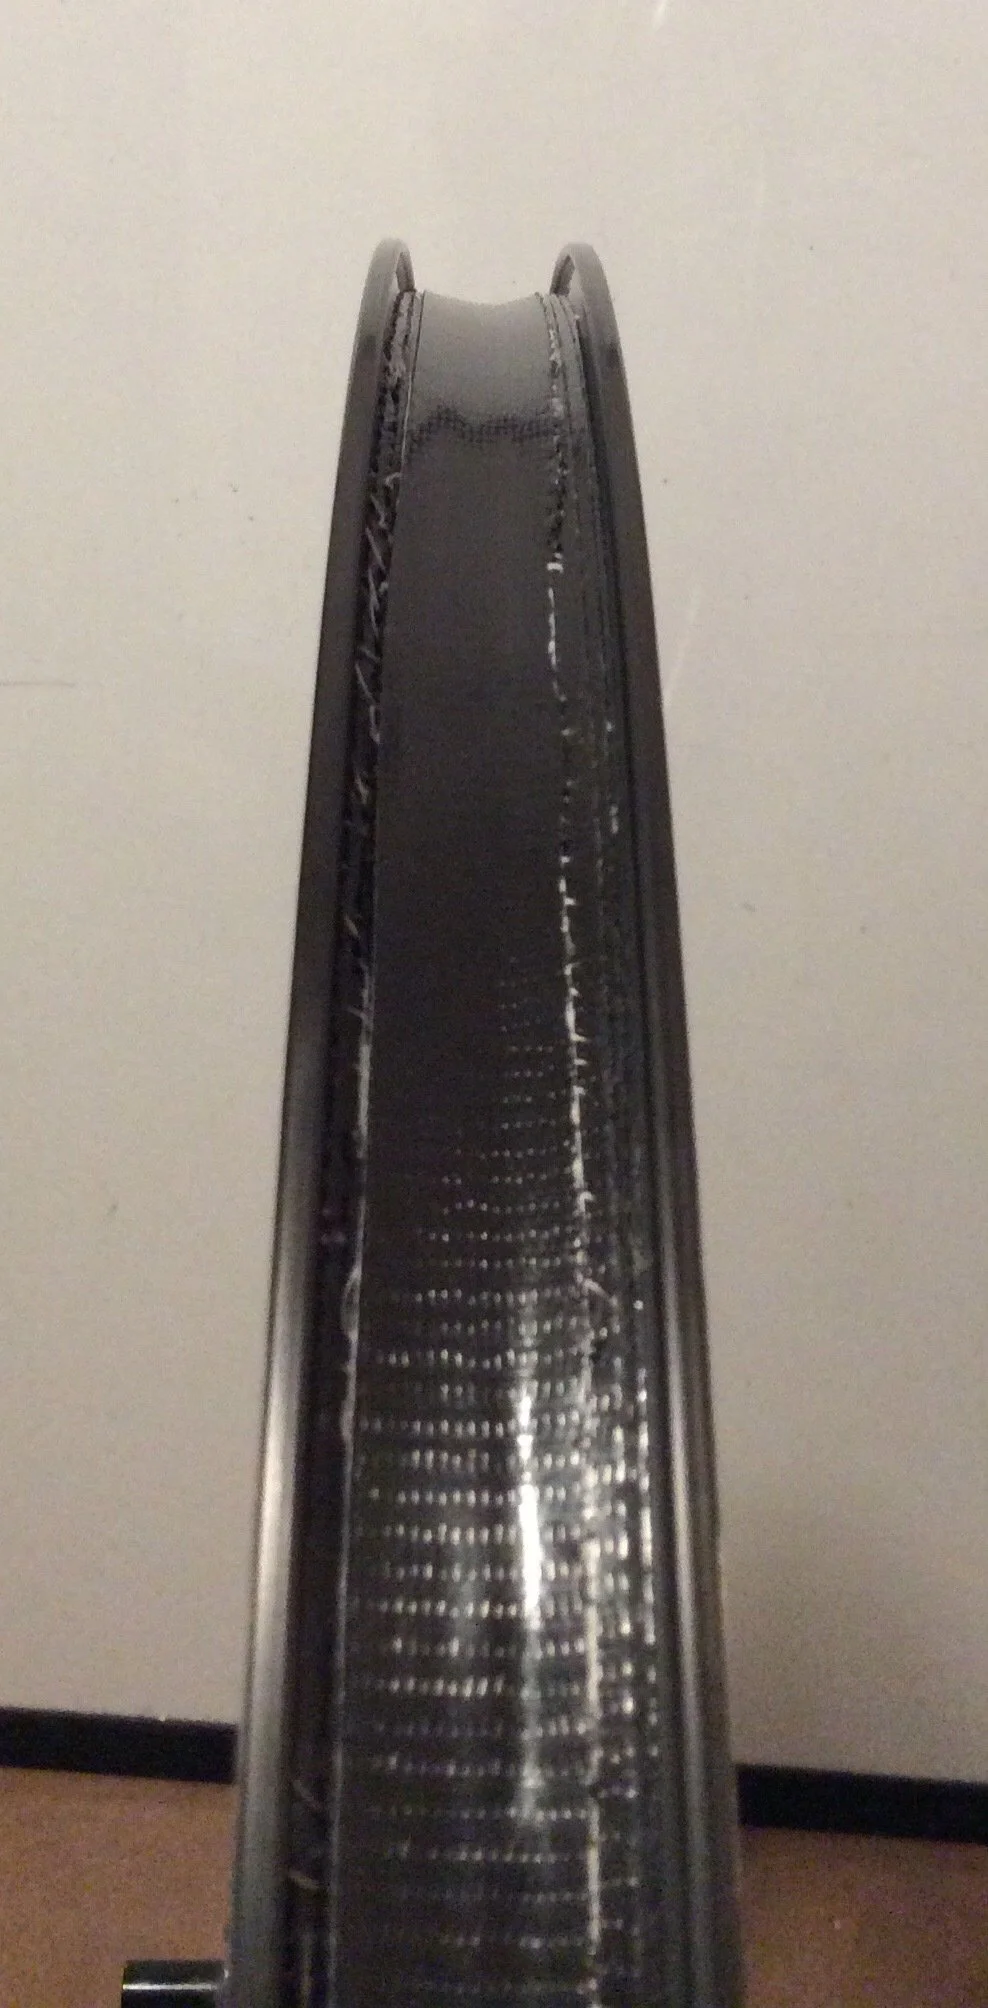
Figure 7. Well layer 4
For the second to last tape layer I went almost edge to edge, but not quite (figure 8). I don’t want to build up thickness on the side of the rim walls.
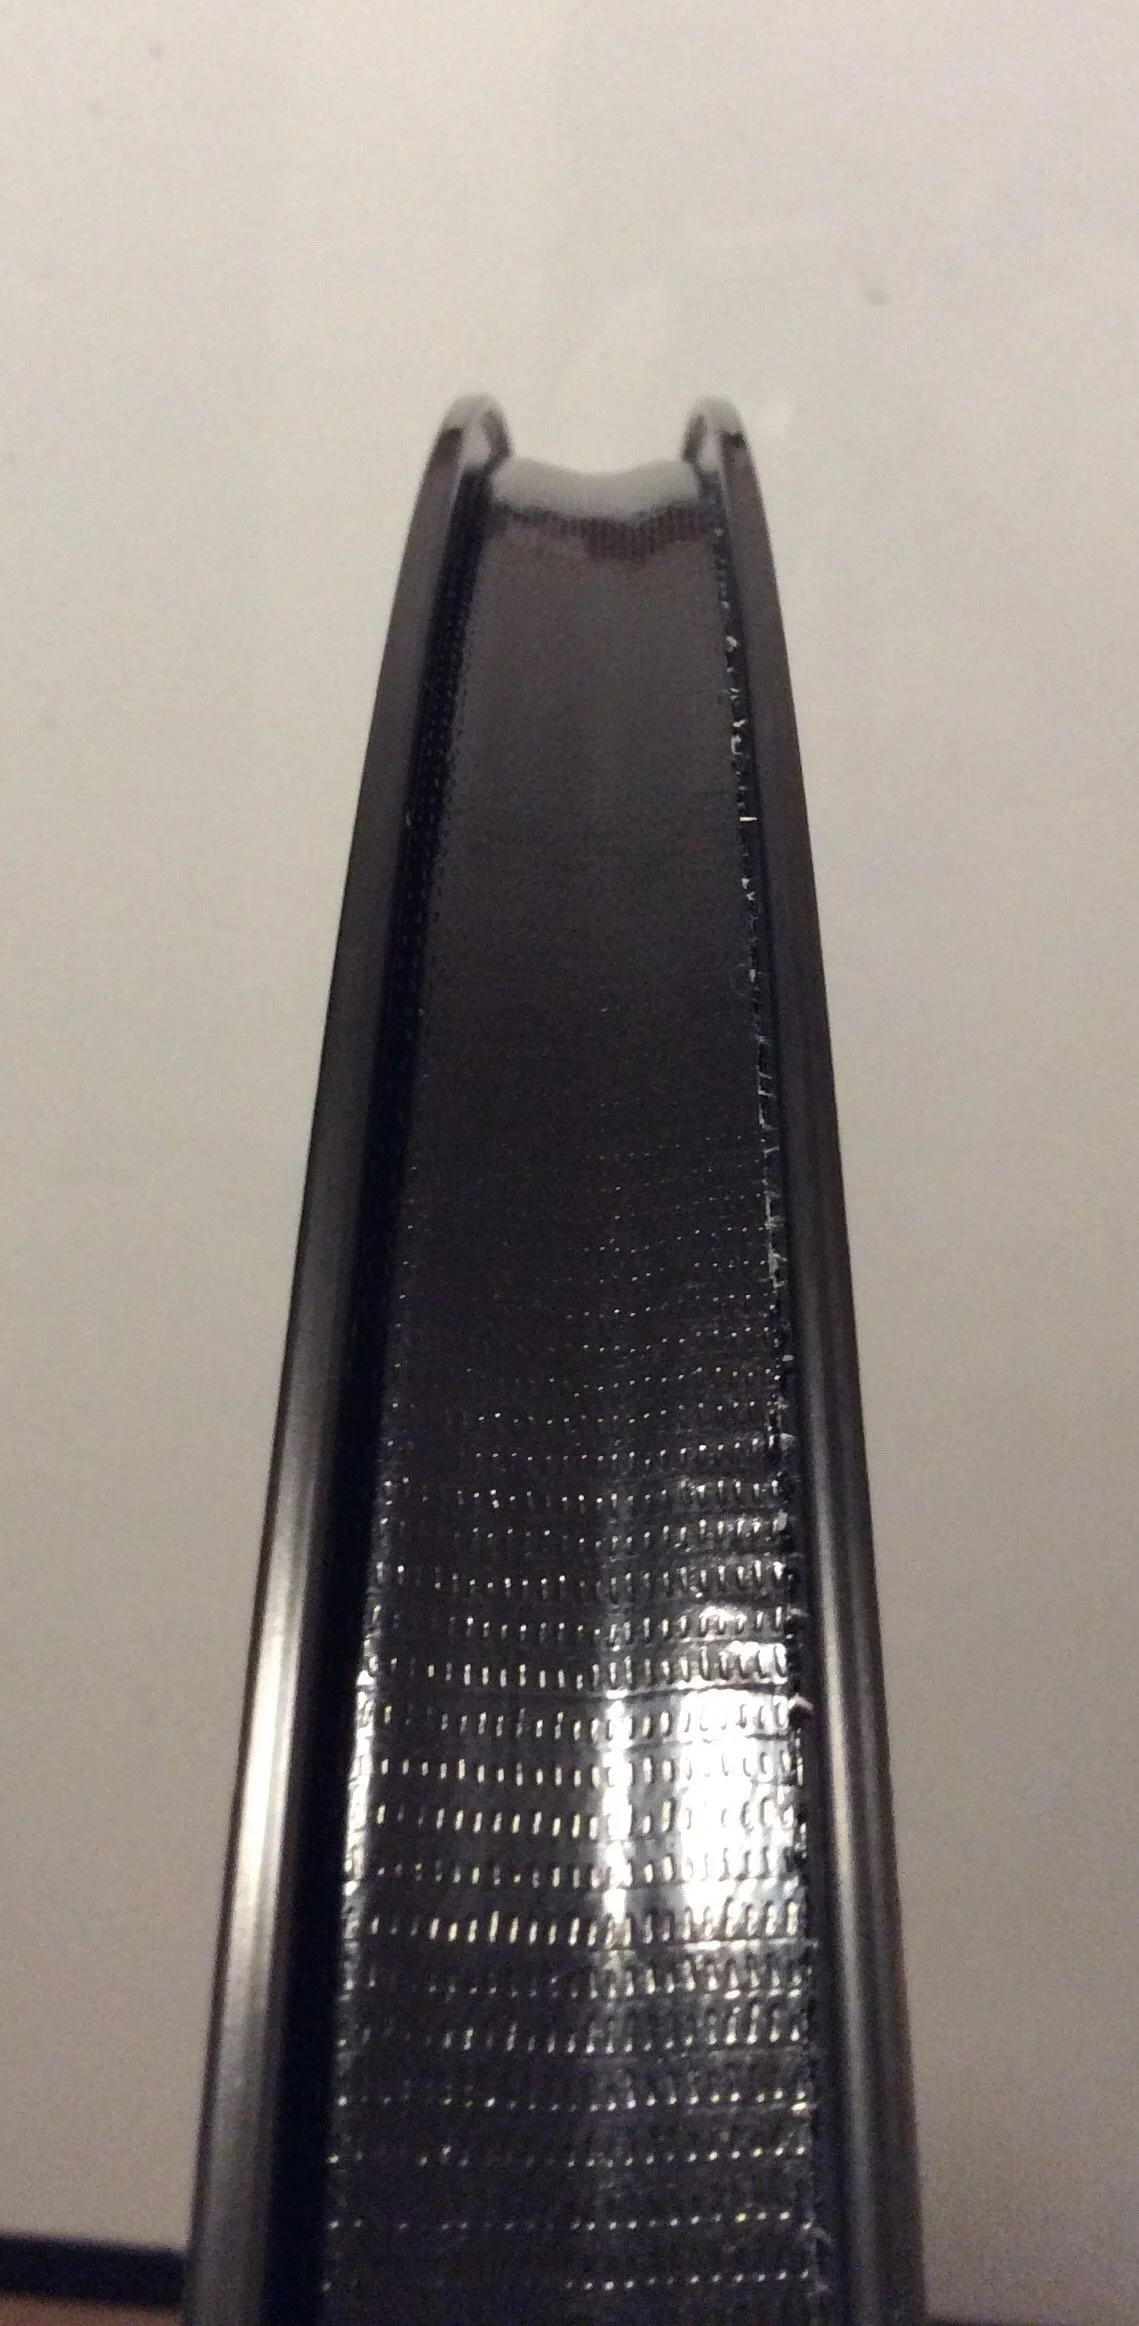
Figure 8. Well layer 5
And on the last layer I cut/tore a strip of tape that went across the whole width of the rim, plus a bit (figure 9). Probably went a bit wide on this, with the tape riding up the sidewalls of the rim higher than I would like. But I definitely did not want to be too narrow, because I don’t want the bead of the tire to snag the edge of the tape and pull it up when I take the tire off the rim.
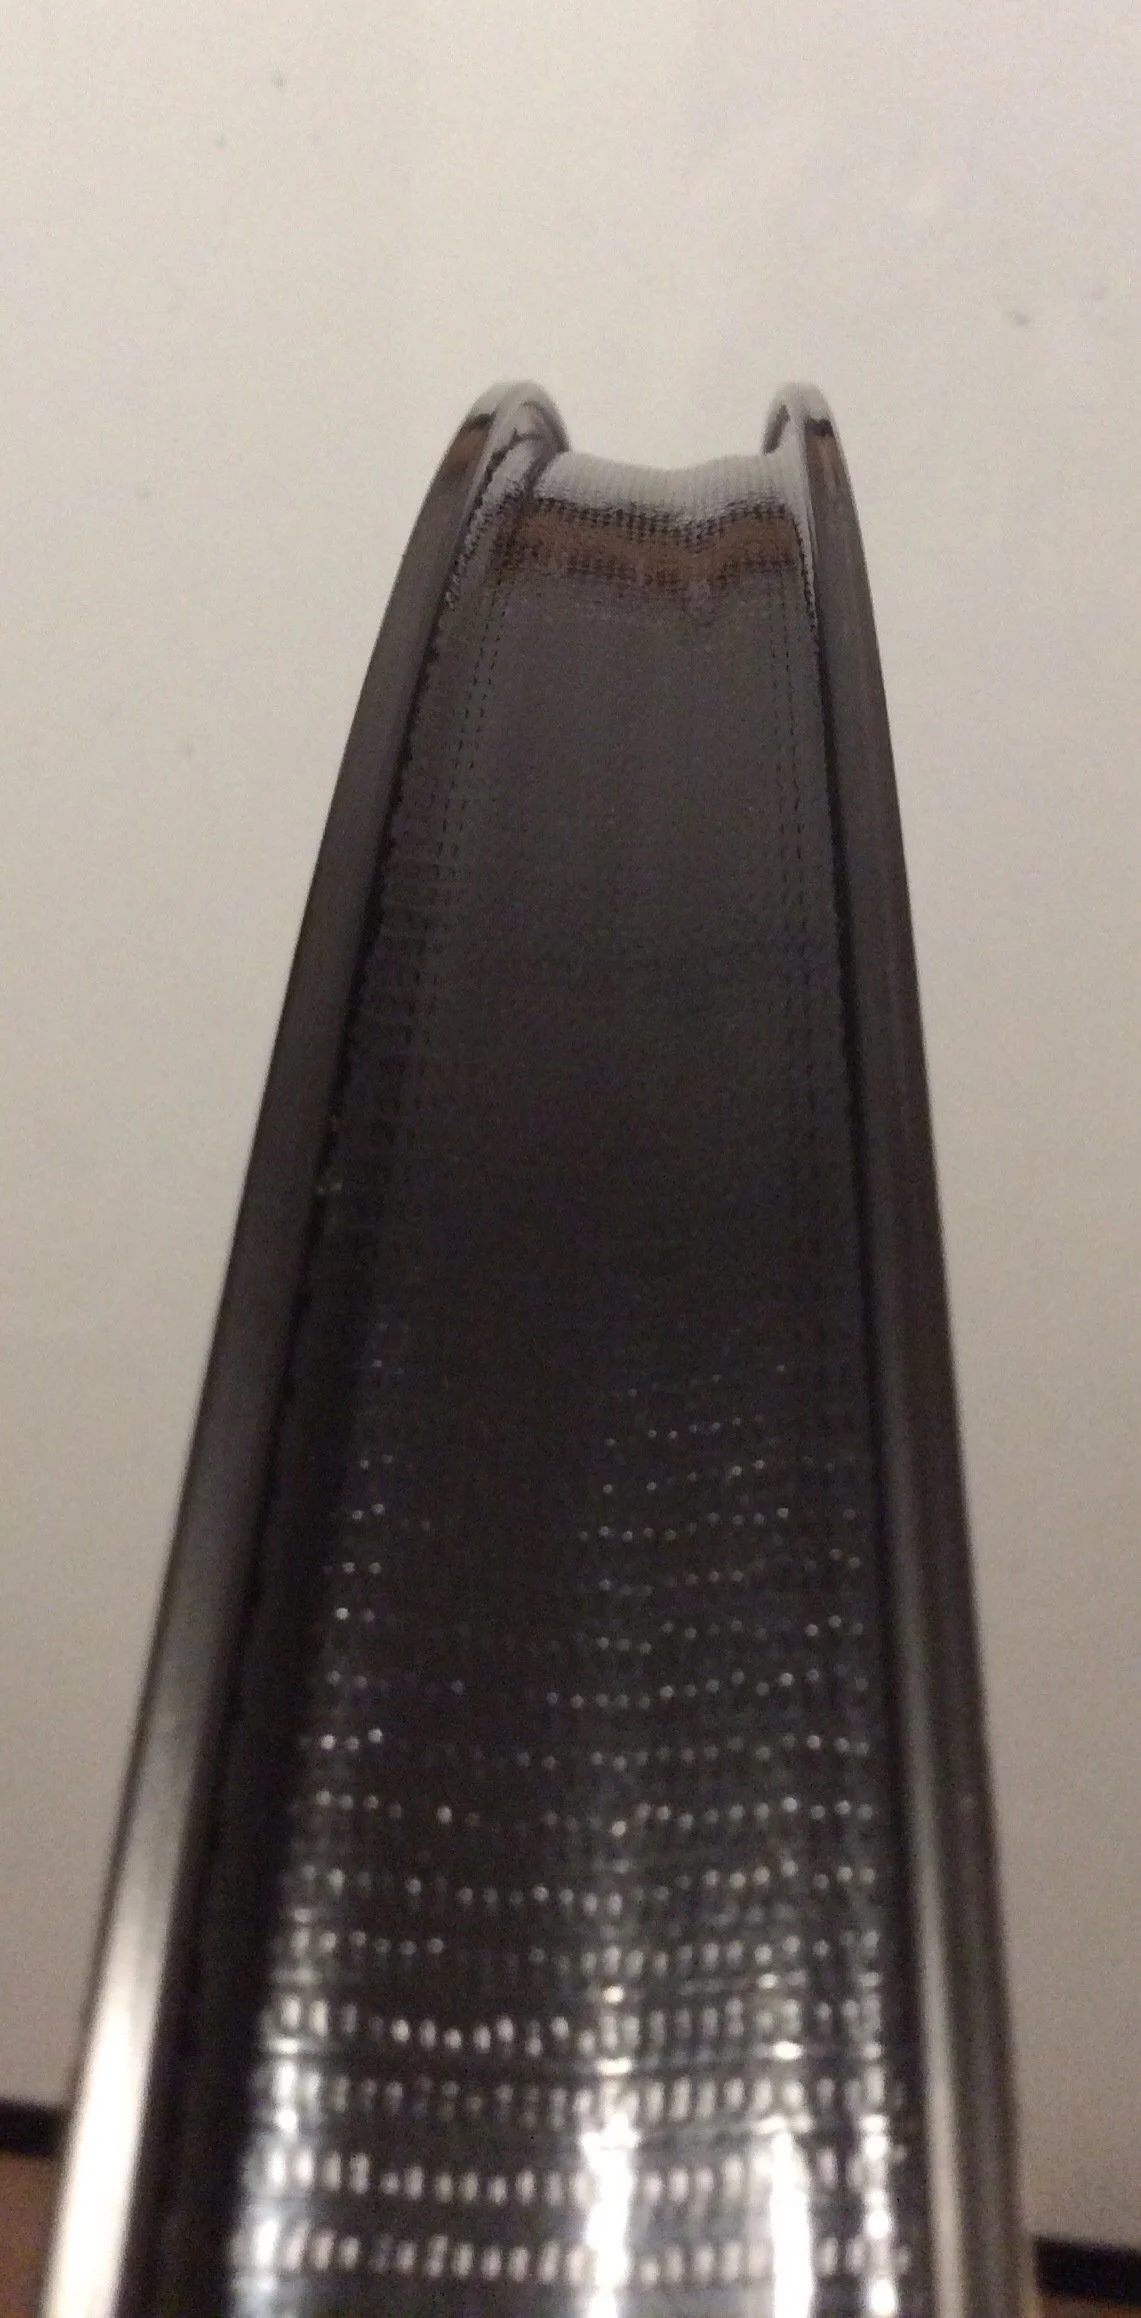
Figure 9. Well layer 6. Final layer. Note the shape of the rim bed profile and the relative depths of the well, shelves, and ridges.
At this point you will install your valve. If it’s a presta valve, screw the valve closed and push it through the valve hole in the rim, puncturing all the layers of tape. If you are using a Schrader valve, cut the hole through the tape some other way. Make sure there is enough space between the rubber on the rim side of the valve and the ridges for the tire bead to sit, if you can. Thread the nut onto the valve stem, locking it onto the rim. You may need pliers to get it tight enough to make a good seal.
Now time to mount the tire. Nest the rim inside the tire, making sure the tire is pointed in the right direction (there will usually be a rotation direction indicated somewhere on the sidewall of the tire). Line up the lettering with the valve if you want to look professional. Bring one bead of the tire onto the rim, ending at the valve. Make sure that the bead of the tire is in the well all the way around, otherwise you won’t be able to get the last bit over the edge of the rim. It will be quite tight, and you will have to use your tire levers strategically. When the last bit finally goes onto the rim it will probably be with a sharp snap. This is good. Just don’t put your fingers where the bead will snap to.
Now put the other bead onto the rim. This one will probably be more difficult, as the first bead will want to hog the space at the center of the rim where the well is the deepest. Shown is figure 10 is the final bit of getting the second bead over the edge of the rim. This happens to be a wire bead tire, and it was very tight (folding beads stretch a little bit, so they are easier to mount). You can see how I use two of the Schwalbe levers to keep the transition pinned in place while I insert a third lever and pry the bead up over the edge of the rim. The pinning lever closest to it gets slid over to the central lever, the central lever gets removed, and the process is repeated until the last bit of bead snaps onto the rim. Make sure to pry with the levers slowly. The tire will stretch a bit with the extra time, so levering slowly will help keep you from breaking your levers. You will need to be patient, attentive, and possibly creative at this step. Soapy water suds may help the tire bead slip over the edge of the rim.
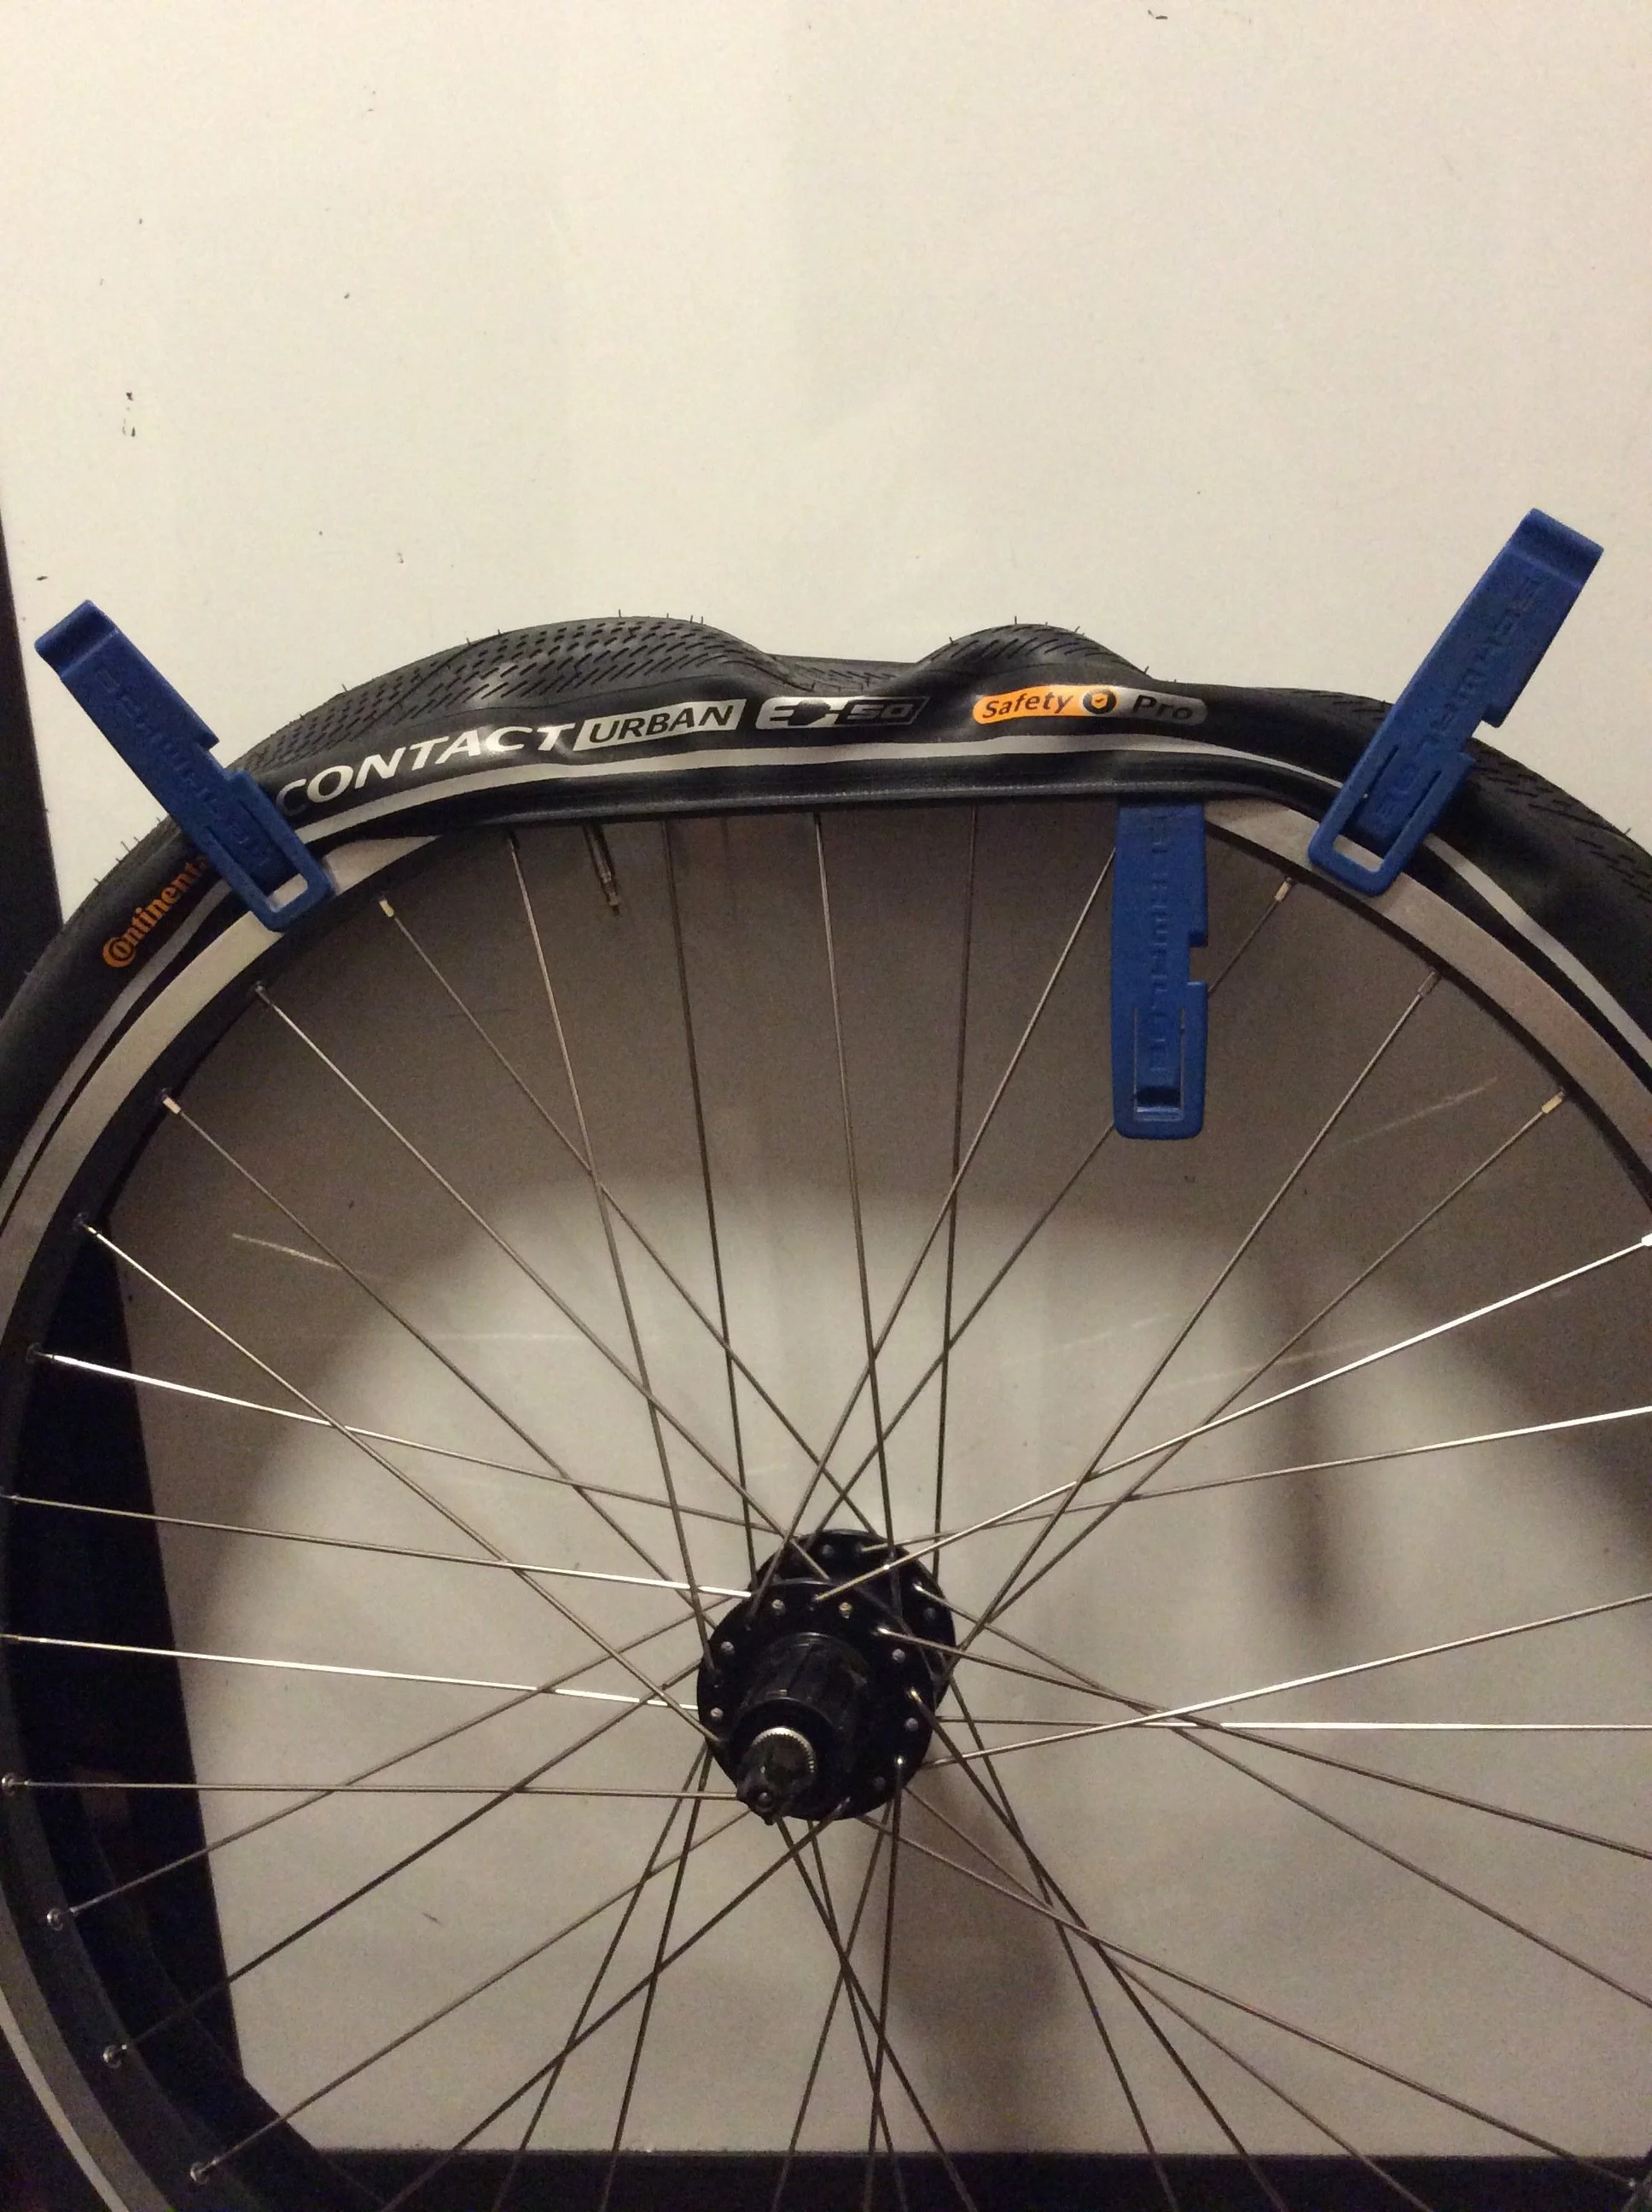
Figure 10. Using flat Schwalbe tire levers to get the last bit of the tire bead onto the rim
Once you get that satisfying snap of the bead onto the rim, make sure the beads aren’t sitting on the rubber part of the valve. If they are, pull them off, towards the side of the rim.
Now do your pressure check. Squeeze the tire. Do you hear air hissing out from anywhere? If not, you are probably good to add sealant. If you are unsure whether you have a good enough seal, go ahead and try pumping up the tire. If air is hissing out around the bead like crazy and the tire doesn’t puff out at all, you probably need to build up the rim profile a bit more. If air does hiss out but the tire does puff up with air, you are probably good to add sealant.
Now remove the valve core and inject sealant into the tire. Replace the valve core and prepare for some exertion. Also make sure you are in a place that’s not too hard to clean up if sealant sprays everywhere.
Instead of injecting sealant through the valve, you can dump it into the tire before getting the last part of the bead onto the rim. But that can be messy if it sloshes or squeezes out, and if it turns out you need to add more tape, you have to clean it off the existing tape with rags and alcohol first. So I prefer to do a pressure check dry and then inject sealant through the valve.
Ok, ready for some furious pumping? Connect your pump to the valve and pump like mad. If you hear air hissing out from somewhere (or more likely see the sealant bubbling out since you can’t hear over the sound of your pumping), rotate that part so it’s at the bottom of the tire where the sealant is so it can seal. Keep pumping until you have a lot of pressure and disconnect your pump. If it’s stable, then great. If it’s hissing (or even if it’s not), hold the wheel by the axle and spin the wheel around to distribute the sealant around the full length of the inside of the tread. If there’s still hissing, focus on getting sealant to those places so they seal up. Then do the Stan’s shake. Stand up and hold the tire in front of you like it’s a steering wheel, your hands at 3:00 and 9:00. Pivot your wrists to bring the wheel to horizontal, so that 12:00 is in front of you and 6:00 is by your chest. Then quickly flip the wheel 180 degrees so the 12:00 and 6:00 switch positions. Rapidly flip the wheel back and forth a few times, then shift your hands about 15 degrees around the tire (still 180 degrees apart) and do it again. Repeat until you’ve gone all the way around the tire. This gets the sealant to coat the sidewalls and beads of the tire all the way around. It’s kind of exhausting, and is easier with smaller wheels than larger ones, especially if you have short arms.
Hopefully there is no more hissing and the tire is holding air. If it has lost a significant amount of pressure, add more. Address any leaks as before, then sit down and catch your breath. If you are going to mount the wheel and ride right away, it should be good to go. If you’re not going to ride on it just yet, you’ll want to check the tire in a few hours or the next day to see if it has lost any air. Likely it has, and you’ll want to add more air. Usually riding on it right away distributes the sealant well enough that it won’t lose pressure.
Do keep an eye on the pressure when you’re pumping up the tire. If you overpressurize it, the tire can blow off the rim. It’s a really loud bang, followed by everything being really quiet, and maybe some ringing in your ears. And neighbors wondering who discharged a firearm and why. Not fun. Oh and then there’s also sealant everywhere. This isn’t specific to tubeless, the same thing can happen with a tubed tire. Just thought I’d put that warning in here.
Troubleshooting
If you need just a little more tape and can’t get the tire off the rim because it’s too tight (more likely with a wire bead tire), you can pull the bead to the inside and try to slip a strip of Gorilla Tape under it that’s a few inches long. You may need to do this in several spots around the tire.
Make sure the rubber on the inside of the bead is smooth. Some tires will have a thin web/fin of rubber on the inside of the bead. If that gets ripped it could cause problems with getting the initial seal. I’ve had this happen once, and the solution was to carefully trim the rest of the web off.
That’s it! You now have done a ghetto tubeless setup. Now go ride your bike and feel how much smoother and easier rolling it is, and maybe ride recklessly through a patch of goathead thorns.
Maintenance Notes:
I like to carry some sealant with me on my bike in a small injector bottle. That way I don’t have to check to see when my sealant dries out and I don’t have to add sealant preemptively. When I notice my tire losing pressure too fast (like when I have to pump it up to full pressure in a few days instead of the regular interval), I remove the valve core and add more sealant, then pump the tire back up. This is the most economical way to use sealant, and that way I always have some for emergencies.
If you get a hole that is too big for your sealant to plug, well they make tubeless plugs (bacon strips) for that. This is the one I carry, and it has a nifty presta valve core remover cast into the container: https://www.genuineinnovations.com/products/bicycle-tubeless-tackle-kit.
And if you get a slit/gash/snakebite too big to for plugs to take care of, you can stitch up the tire. I’ve done that on several occasions and the stitched repair lasted for the remaining life of the tire. Tutorial here (add link).
As with a tubed tire, if something goes horribly wrong you can always pop one bead off and insert a tube. It’s good practice to always carry a spare tube and patches for such exigencies.
Appendix
20” tire recommendations for the folks with the Mercier mini-velo who prompted me to write this tutorial
It looked like you have room for at least 50mm wide tires, but I didn’t measure. This source claims 1.75” (44mm) max (https://www.bikesdirect.com/products/mercier/nano.htm). I would check with calipers if you want to max out tire size (the bike will be more comfortable and capable that way). Remember that a bigger tire will have a larger radius as well as a larger width (Tioga is nice and tells you the tire’s outer diameter when inflated). Check clearance at the fork crown, seatstays, chainstays, and brake arms (when the brakes are engaged). You’ll want a minimum of 3mm clearance between the tire and anything. 5mm clearance is better. If clearances are different between front and back and you want to maximize tire width, you can use different tires. Front and rear bike tires have totally different jobs, so there is no need to have them be identical.
Sometimes tires inflate to larger than advertised width. In my experience that is rare, and they often inflate to less than the advertised with. If you want to maximize width, check the tire first by installing it on a wheel and inflating with a tube before you go to the trouble of making it tubeless.
Your rim size is 406mm (https://sheldonbrown.com/tire-sizing.html). For fast, comfortable tires you want supple. This is dependent on the rubber/carcass thickness and the rubber compound. Not every tire is made so supple, because thinner rubber is more susceptible to punctures. But if you go tubeless you don’t really have to worry about that. A good resource for tire speed (really tire efficiency) is www.bicyclerollingresistance.com. Unfortunately there are a lot of good tires that Jarno Bierman hasn’t tested yet. But you can learn a lot from perusing the test data.
In the absence of good data on suppleness and speed, you have to make an informed guess or go with experience. You can also look at what the tire is marketed for. In my experience, higher end BMX race tires and dirt jump/pump track tires tend to be supple and efficient, especially when set up tubeless. All of these recommendations are from that market. You’ll note that Maxxis DTH is absent from my recommendations, as in your size they are only offered with EXO sidewall protection, which makes the tire stiff and not supple (the 2.3” DTH in single compound without sidewall protection is like riding on a cloud when you have the right pressure). There are also some good looking urban/city tires that would fit the bill, but they have wire beads and so I won’t recommend them to someone doing a tubeless setup for the first time.
With all that said, here are my recommendations for you:
Tioga Fastr-X BLK LBL and S-Spec: https://www.tiogausa.com/product/fastr-x/
Tioga Powerblock S-Spec: https://www.tiogausa.com/product/powerblock/
Tioga Fastr BLK LBL and S-Spec: https://www.tiogausa.com/product/fastr-2/
Tioga Fastr React S-Spec: https://www.tiogausa.com/product/fastr-react/
Schwalbe SX-R: https://www.schwalbe.com/en/SX-R-11654609
Schwalbe Billy Bonkers: https://www.schwalbe.com/en/Billy-Bonkers
IRC Siren Pro Rise TLR: https://shop.ircbike.com/collections/all-tires/products/siren-pro-rise-tubeless
IRC Siren Pro TLR: https://shop.ircbike.com/collections/all-tires/products/siren-pro
Michelin Pilot SX Slick Racing Line: https://www.michelinman.com/bicycle/tires/michelin-pilot-sx-slick-racing-line
I put tubeless Tioga Fastr S-Spec tires in 20x1.75 on the Bike Friday I had, and I liked them.
I am currently using a tubeless Schwalbe Billy Bonkers in 26x2.10, and it’s great.
The other tires I do not have personal experience with, but recommend them due to experience with similar tires from the same manufacturers.
